Sunday 26 May 2019

Peninsula War Game

Today we had a large Napoleonic Peninsula War game at Barry's. The period was early - 1807/08 - when the Spaniards were still allied with the French. 

Several collections had their maiden outing in this game, including Paul's Peninsula British and Marks Spaniards.

Chris did the scenario and gave us large forces - each British player had two brigades of 5 battalions with a battery of guns per Brigade. The Spaniards were the same and the French had two brigades of 6 battalions plus artillery. Each side also had a small cavalry force.

The British were trying to force the road to Madrid. The Spanish force stood in their way, awaiting support on each flank from the French.

The game was an unmitigated disaster for the British - the only thing that went our way were the first few rounds of artillery fire, which did a lot of damage to their Spanish opposite numbers. Adrian then advanced in the centre but was soundly thrashed by the supposedly inferior Spanish troops. Barry's French force arrived in Paul's rear and smashed that wing of the British force into bite sized chunks, and on my flank, nothing much happened at all.

It was so one sided I really can't summon the energy to provide a blow by blow account - here are the pictures I took...


Paul's force on the British left flank advance across the river

 Mark's Spanish force blocking the route to Madrid
 Part of my Highland Brigade on the British right wing
 Portuguese component of my second brigade
 Barry's French force enters the field to Paul's rear
 Spanish guns in action against Paul
 The British deployment on the right wing - French cavalry scouts have just come into sight
 In the centre, Adrian's massed British infantry advances, supported by Paul and artillery on the high ground
 On the British left, Barry's French force pushes forward
More of Barry's force closing on Paul's exposed rear
  Whilst on the other flank, the first French brigade under Rick makes an appearance
 A view of the British assault in the centre - the three nearest units have routed from combat
 Paul and Barry come to grips
 Another French assault by Barry pushes Paul's Brits out of the woods
 With the arrival of the French, I decide a tactical redeployment to the rear was called for....
 Meanwhile in the centre, the struggle continues
 And on Paul's flank, the French juggernaut grinds steadily onwards
 View from the hill top church where Rick's first brigade arrived
  But wait, there's more! Rick brings on his second brigade to the left of Mark's Spaniards
 Action see saws to and fro in the centre
But the Spaniards held and forced the remainder of the attacking British to retire
Barry wiped out at least half of Paul's force and Rick and I never came to blows - a bad day at the office for John Moore...


Friday 24 May 2019

RCW Vehicles - (Almost) Completed Truck and Two New Purchases

I have made very little progress this week as I have been so busy at work, when I get home, I cant be bothered doing much of anything...plus, vehicles, scenery etc is not my favourite thing to paint, so I also lacked motivation from that perspective as well.

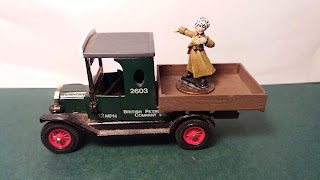
Tonight I finally managed to finish off the converted truck - although it does still need a driver - and perhaps some crew/passengers in the back...I haven't decided on that as yet.


I have also managed to get my hands on a vehicle to use as a staff car for senior officers....and while I was about it (seeing as the guy did 2 for 1 on postage) I obtained another truck - a genuine one this time! I think that should be about enough vehicles to be going on with......


Monday 20 May 2019

RCW Vehicles - Update

This is the progress I have made with the RCW vehicles. The truck has been undercoated and given the first coat of dark green - and the Model T Ford has finally turned up a week after being paid for - usual NZ Post service!


Above and below a converted Model T Ford 

Below the armored car finished


Above and below - Model T Truck I received today

Below - converted truck with first base coat of dark green


This is probably enough - except that I NEED a staff car - so will be on the look out for one of those over the coming weeks!

Tuesday 14 May 2019

Some RCW Vehicles

Inspired by the fantastic conversions I have seen on the "Over Open Sites" blog, I recently realized I could try my hand at a similar project for the Russian Civil War. Trawling through Trade Me (our local NZ version of eBay) I found literally dozens of Matchbox Yesteryear car models for sale at really low prices. I settled on a group of 5 trucks and managed to purchase them for the princely sum of $NZ19.50 - or under ten quid in the Queens money!

These are the vehicles I purchased


I have started working on converting two of them - the Liptons Tea vans - one into an armoured car and the other into an open backed truck. I am not sure yet what I will do with the remaining three, which I think are all Ford Model T trucks. 

Also recently purchased is a genuine open back Model T truck, which will be usable exactly as it is, with just a new paint job required. I might drill out the rivets so I can add a driver - or I might not bother. I have also put in bids tonight for a few more - starting at $1 - one is a four door sedan that will look really good as a staff car if I win the auction!

First conversion - armoured car


Second conversion - Red transport...


As with everything in wargaming, the trick now is to know when is "enough" - with the models available at Buy Now around $7 each, I am sorely tempted to get a few more - but when will they ever be used??

Saturday 11 May 2019


On Friday, Nick, Chris and I met at Julian’s for another run through with the RCW rule set, Red Actions. This time, three Red units supported by three HMG’s were defending a strategic village. The Commissar had enough time to force the local peasants to construct rudimentary field works before they decamped.


Attacking the position from two directions simultaneously was a force of eight units of White infantry supported by two HMG’s and two mortars.


The defenders had an opportunity to summon reinforcements in the shape of two units of Red cavalry and a Tachanka. This was achieved by a roll of a one on turn one, one or two on turn two…and so on, you get the picture.


I commanded the defending Bolsheviks, Julian the reinforcements and Nick and Chris took a White command each.


The layout of the table was such that almost all fire was on the lowest possible casualty column for almost the entire game – even the HMG’s had little effect, and the Whites sniped from the nearby woods whilst the Reds sheltered behind their barricades, keeping a desultory fire on the attackers.


This situation played out for a couple of turns until Nick managed to get a direct hit by the mortar on the one HMG on his flank. This happened just in time, as on the next turn, the Red Cavalry appeared right behind the mortar position and wiped it out! Nick turned one infantry unit to confront the cavalry whilst moving forward with the remaining three units plus the HMG.


Meanwhile on the other flank, Chris advanced cautiously with two units, supported by mortar and HMG fire, whilst the other two units made a flanking march to the area of the village that lay undefended – due to the paucity of Red troops committed to the task.


Stretched to breaking point, the Reds cause suffered a final nail in the coffin when Chris advanced an infantry unit very aggressively into close range of the HMG defending the rear and wiped it out with close range rifle fire.


I called the game at this point, with White troops storming forward on both flanks


Map One - initial layout


General view of the table seen from the opposite direction than the map above. White positions are top left (Nick) and top right (Chris)

The local commissar bears a striking resemblance to a famous revolutionary hero.... and is accompanied by two Bolshevik Heroines


Nick's counter revolutionary lackies assembling in the shelter of the woods

On the other flank, a similar force assembles under Chris's command

The staunch defenders of the proletariat in their slightly exposed position

Chris's first line begins to edge forward - initially, both units were pushed back into the woods by Bolshevik fire

The view from the Red barricades facing Chris

Here they come again....


This was the situation on turn 3 as I rolled the correct number to summon help!

Much to Nick's chagrin, Julian's Red Cavalry appeared right behind his mortar position - but it had already eliminated my HMG with a direct hit.

View from Nick's flank - his main force in the woods bottom right and the single infantry unit right centre with Red cavalry on its six :)

Both Chris's units move forward from the wood line again

And with the HMG neutralized, Nick advances too

Edging forward

Nick's command on the edge of the village

Red cavalry making hard work of overcoming a single White infantry unit

The Whites treated the cavalry to a round of close range fire, and did next to no damage!

The position close to the end of the game, with White infantry closing in on three sides of the village

Nick's men storm the first line of defence (bottom right) while Chris moves two units to the undefended rear of the village (top left)

On Chris's flank, two units engage in an exchange of fire whilst the other two head towards the exposed rear of the village

The unit to the right advanced into close range of an HMG in the barn and rolled high, causing two "terror" markers, enough to wipe out an HMG!

The White infantry poised for the final assault....


…..which never came! The Red infantry threw down their weapons and tomorrow, most of them will march off as soldiers in the White Army, living to fight another day. The commissar and officers of course will be put up against the nearest wall! 

A hard game for the Reds but if Nick had not fluked knocking out the HMG, it might have been a bit different. The reinforcing cavalry had very little impact except for knocking out the mortar and three units of infantry were insufficient to hold the line, but it was good to get another game under the belt and we are all starting to remember most of the mechanics of this system.