Battle of Cheriton Inspired ECW Game
On Sunday I made one of my rare forays to play an
all day game with the group I have wargamed with for around 25 years. Today the
period was English Civil War and our host Barry had set up his huge 12’ x 6’
table with a scenario based roughly on the Battle of Cheriton in March 1644.
Following is a brief outline of the real battle courtesy of Wikipedia
Early
in 1644, a Royalist army under Lord Hopton faced a
Parliamentarian army under Sir William
Waller in the southern counties of England. After some reverses
during the previous December, culminating in the Battle of
Alton, Hopton had withdrawn to Winchester to
regroup and recruit. He was joined here by a detachment from the King's main
"Oxford Army" under the Earl of Forth, who
unwillingly took command of the army. They resumed their advance eastward early
in March.
Waller's
army of the "Southern Association" had also been reinforced by
detachments from the main Parliamentarian army under the Earl of Essex and the
London Trained Bands, and was advancing westward from his winter quarters
near Arundel.
Forth and Hopton determined to seize New Alresford,
thus placing themselves between Waller and London. They forestalled the
Parliamentarian cavalry under Sir William Balfour, and occupied the town
late on 27 March.
On 28
March, the Royalists advanced cautiously south from Alresford. An advanced
guard under Sir George Lisle occupied an outpost position
near Cheriton as night fell, and reported that
the Parliamentarians were retreating.
The
Parliamentarians had been outmanoeuvred up to this point, and had indeed begun
to retreat, but overnight Waller changed his mind and ordered an advance. As
dawn broke, the City of London Brigade occupied Cheriton Wood. Hopton had moved
to Lisle's outpost, and realised that it would have to be hastily withdrawn.
The Royalists fell back to a ridge north of the wood, as Waller advanced.
Hopton
determined to recapture Cheriton Wood, and sent forward 1,000
"commanded" musketeers under a Colonel Appleyard, supported by a
battery of guns. There was some hot fighting, but the Parliamentarians
abandoned the wood. Forth and Hopton intended to stand on the defensive at this
point, but an impetuous infantry commander, Sir Henry
Bard, launched his regiment of foot against
the Parliamentarian left wing horse. Bard's regiment was overwhelmed and
destroyed by a charge from Sir Arthur Haselrig's regiment of horse. (This was
not his famed Cuirassier regiment which had been destroyed at Roundway Down
some 8 months earlier, instead the regiment had been rebuilt as 'regular'
cavalry since September 1643). The Royalist cavalry on the right wing tried to
support him, but were forced to make disjointed attacks along narrow lanes and
were defeated in turn.
Hopton
sent the Royalist horse from the left wing under Sir Edward Stawell to
make a better prepared attack, but they were also defeated. Haselrig's regiment
now attacked the Royalist foot moving up in support, and drove them back. The
Parliamentarians also attacked the Royalist left, which had been denuded of its
horse, and regained Cheriton Wood.
The
Royalists fell back to their ridge, but Hopton and Forth realised they could
not withstand a deliberate Parliamentarian attack the next day. As evening
fell, the Royalists retreated to Basing House, having
lost many brave cavaliers including their Lieutenant General of Horse: Lord
John Stuart, Major General of Horse: Sir John Smith, Sir Edward Stowell and
Henry Sandys of the Vyne, grandson of William, Fourth Lord Sandys. In
addition to these casualties, Raoul Fleury (c/o of the Queens Regiment) and the
aforementioned Sir Henry Bard were both badly wounded.
The
defeat of Forth's and Hopton's army left the King's plans of a thrust into
Sussex and Kent in tatters. It also allowed the Parliamentarian armies of Essex
and Waller to concentrate against the King at Oxford. The king merged the
remnants of Hopton's army into his own at the review held at Aldbourne during
April 1644. The infantry was formed into a single brigade under Sir Bernard
Astley while most of the cavalry was formed into Sir Humphrey Bennett's
brigade, with other remnants joining Lord Wilmot's brigade.
Although
Charles was able to partly restore the situation later in 1644 by gaining
victories at Cropredy Bridge and Lostwithiel, the Royalists could never
again resume the offensive in the south of England. The
prominent Royalist statesman, the Earl of Clarendon,
considered the battle a disaster.
Our scenario followed most of the layout for the
actual battle, but with reduced numbers. All the Parliamentarians were graded
as Raw. The Royalist horse and one regiment of foot were graded Trained, with the
remainder Raw. We used our own “house” rules.
The Parliamentarians had a left wing of two horse
units, including Haselrigs, a gun and three regiments of foot. The right wing
consisted of two regiments of foot, two of horse, two guns and the detached “commanded”
musketeers in the woods.
The Royalist left consisted of two units of commanded
musketeers in the woods, two regiments of horse, two of infantry and one gun.
The right was one regiment of horse, two of foot and one gun.
The game lasted about four hours, by which time we had
basically fought each other to a standstill. The entire Royalist left wing was
destroyed and the right wing lost its cavalry and gun. The Parliamentarian
right retained one cavalry and one infantry regiment, and the left their
original two cavalry and two of the three infantry – a bloody engagement
indeed!
Here is my map of our original layout as the game commenced:
The initial several moves were desultory, as both sides engaged in an exchange of cannon fire. Barry our umpire was getting increasingly frustrated with our lack of proper aggressive spirit! The Royalists had the better of the exchange of gunfire, scoring several hit on the left wing cavalry and forcing them to retire to cover behind the ridge. A poor activation roll also led to the Parliamentarian left wing losing it one artillery piece! On the right, the Parliamentarian guns also forced the cavalry to retire and one infantry regiment to quit the field but in the woods, the Royalists soon had the better of the firefight and destroyed the Parliamentarian commanded shot.

The Royalist cavalry now advanced simultaneously, the right flank unit moving adjacent to the woods in the centre of the field, whilst the two regiments from the left flank moved up to support the commanded shot emerging from the woods. The Parliamentarian right had to hastily redeploy towards the centre to face this threat to their flank whilst the left flank advanced to engage the two regiments on the heights before them.
There now followed the strangest combat of the day, whereby a regiment of Royalist cavalry charged a lone gun and after two rounds of combat, not only lost, but rolled such a poor activation dice that they quit the field entirely! The cavalry adjacent to the woods were also forced to retire to the centre of the Royalist line.
The commanded shot from Cheriton wood and the remaining cavalry continued to press on the Parliamentarian right, the remaining infantry unit descending the hill and attacking and destroying the gun in the centre of the Parliaments position. However, disastrous activation rolling again led to this victorious unit fleeing the field!
The Royalist cavalry redeployed from the centre back to face the Parliaments left flank and charged Haselrigs unit. Two or three rounds of combat ensued until the Lobsters were pushed back; however, both units had exhausted each other in this combat, and the second Parliamentarian cavalry regiment succeeded in getting in the rear of the victorious Royalists, charging them and wiping them out. The Royalist infantry charged off their hill - one unit suffered heavy musketry and failed to go in, the second pressed home courageously and destroyed their opposition. Meanwhile, the third, unengaged Parliamentarian foot regiment advanced up the hill and wiped out the Royalist artillery there.
The combat on the other wing had continued in the meantime, with the last remnant of the Royalist left, a lone cavalry regiment, destroying one of the two regiments of foot. However, they were then assaulted from each side by the remaining Parliamentarian infantry and a cavalry regiment.
This is where we ended the game - maybe Parliament won, but in effect, it was closer to a draw - Parliament had more units remaining on the table, but the two Royalist units included one that was Trained as opposed to Raw and the bulk of the surviving Parliamentarians were very tired from the days combat!
Here are some pictures I took of the game, The figures are a mixture of Front Rank and Foundry, mostly painted 20+ years ago, but still looking pretty impressive today.
The Royalist deployment before the game commenced
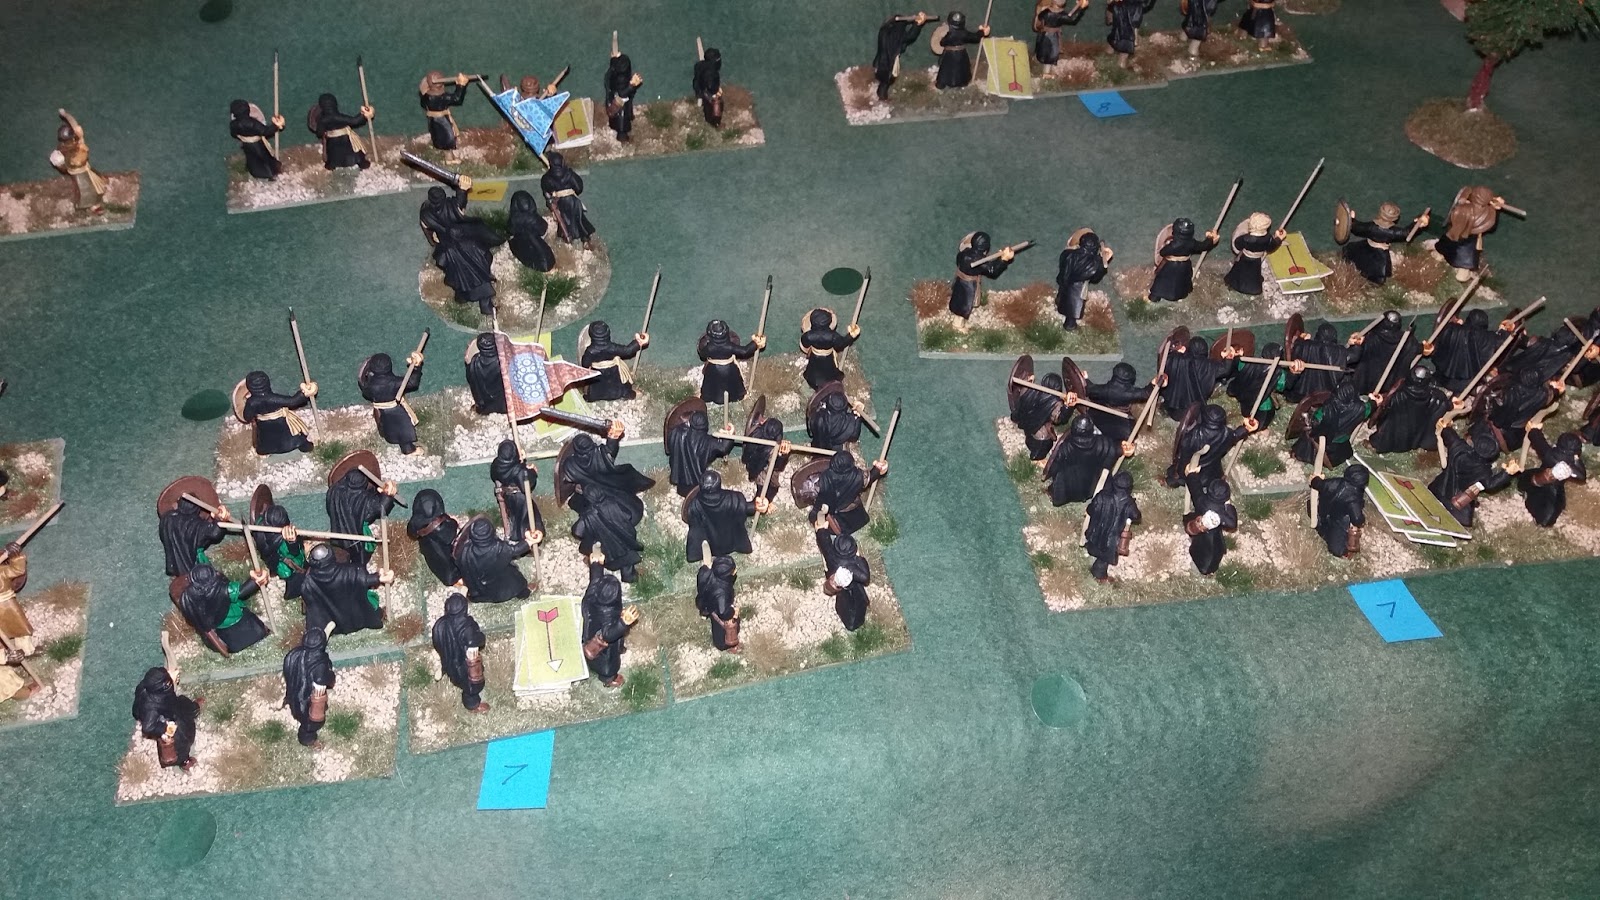
The Parliamentarian left wing
One of the Parliaments Raw Regiments of Foot
The cavalry on Parliaments left redeploy to cover after several hits from Royalist artillery
The Royalist Commanded Shot advancing through Cheriton Woods
The Parliamentarian left redeploying as the commanded shot win the fight in the woods and threaten their flank
The left wing cavalry move forward again
The Royalist cavalry from the right flank advancing towards the centre of the table
The Parliamentarian left begin their advance
Meanwhile, on the opposite hill, two regiments of Royalists plus a gun await them
The Cavalry redeployed on the left flank to support the infantry advance
The infamous Royalist cavalry charge on the Parliaments right wing - a single gun won two rounds of combat and then drove them off!
The Royalist commanded shot advancing from Cheriton Woods
The second round of cavalry v's gunners melee
And then...one Royalist cavalry unit has quit the field and its support has retired some distance!
The Parliamentarian left wing continues to advance
The Royalist right with the cavalry in the centre of the line, before they moved back to the wing
A general aerial view of the action on the Parliamentarian left wing - the Royalist infantry has begun to descend from the hill
The Royalist infantry smashes into one of the Parliaments gun batteries in the centre of the field
The cavalry combat on the Parliaments left - note the second Parliamentarian regiment ready to charge the rear of their opponents
The result of the Royalist charge on their right - the blue unit has destroyed one Parliamentarian regiment but the red unit (Queens Guards, the only trained infantry on the field) failed to charge home after withering musket fire from the white regiment
The Royalist cavalry have pushed back Haselrigs regiment but it is a pyrrhic victory, as the second Parliamentarian regiment charges into their rear and destroys them
The last action on the Parliaments right - the yellow coated Royalist cavalry about to be decimated by simultaneous flank attacks
The two Parliamentarian horse regiments facing each other after the destruction of the Royalist cavalry
Final view - the only two remaining Royalist units on the table (blue and red uniforms)
The commander of the Parliamentarian left wing
A great game - to start with, we Parliamentarians thought nothing was going our way, especially after I managed to lose my only gun in about move three or four, and then Paul lost the combat in the woods and the cavalry charged forward - but the staunch defence by his gunners swung the psychological advantage over to us, and some unlucky activation throws by Rick removed half of the Royalist force from the battle! I was lucky to overcome Chris in the cavalry melee, whilst he had the better of the infantry combat. As I said, not sure we really won, but we did have more intact units on the table when we called "time".
 Above - Initial deployment of the two armies as the game commenced