Sunday 31 January 2021

Border Reivers "Garrison Men"

 Over the last couple of days, I have finished off a few more of the TAG Border Militia figures. I am still struggling with exactly how to paint them, but I have settled on the idea of putting most of them in "uniform" coats - as that is how the two packs of firing figures are described, albeit English, 

I am not sure how accurate it is, but there are a few images of Scots troops at Flodden, which is roughly the right era, and they are shown wearing a Saltire cross of St Andrew on their padded jacks. I noticed Aly Morrison had replicated this in his experimental Scots pike man for the period, so I have followed suit.

The figures I am using are intended as English Border Militia and the firing figures are wearing a coat with obvious trim around the "skirt" and sleeves, so I have painted them dark blue with a white trim, and a mixture of colours for the rest of the clothing. The various forms of caps are all blue, with the exception of those wearing a steel helmet.

I am reasonably happy with the results and I really wanted some level of uniformity to differentiate these figures from the genuine Reivers

I wont bother with individual descriptions - the first three are fully based, the remainder are not. Images 4 5 & 6 are from one of the two firing packs I got to augment the four packs that came in the unit builder deal. Its the firing figures who sport the "uniform" coats and gave me the idea for how I will paint this group (the first three predate my inspiration but I will leave them as is to add some variety)


Following are a few images from a recent walk. Just to prove you dont have to go to the back of beyond, this is a coastal walkway in Mangere, Auckland, only about 15km from the city centre and 10km or so from the Auckland International Airport.


Above, Google Earth showing the area where we walked, Ambury Regional Park. Note the top left, the suburb of Lynfield, which is where our friend Barry lives and where all out Sunday group games take place


This is a Pukaki, not to be confused with a Pukeko. The former are very numerous and dead ones are often seen on roads and the Auckland motorway, whilst the latter are endangered and a protected species...they look pretty similar though!


View looking north towards Auckland


Close up of the previous picture showing the famous One Tree Hill, minus the tree which was chopped down by a Maori Activist a few years ago. The hill was made famous internationally by a U2 song that was named after it


View across the water of the Waitemata Harbour towards Barry's place


View out towards the Manukau Heads


One of two large horses kept at the farm park - I took this image as the horse looks like the type of animal the Border Reivers would have ridden


A couple more views of the scenery. 


And it would not be New Zealand without a few sheep!

Friday 29 January 2021

Another Game of "Sharp Practice"

 Yesterday (Thurs 28 Jan) Julian and I had a second game of Sharp Practice, once again using his Front Rank SYW/FIW figures painted 20+ years ago. Julian had laid out the scenario before I arrived and explained it to me thus:

"The French occupy two farms and the approaching British wish to secure a nice dry billet for the night. To win, the British must assault and take one or other of the farms."

A quick glance at the table indicated the British seemed to have the easier job this time, so I volunteered to take them (as I was French last time, this seemed eminently fair to me!). Julian being the absolute gentleman that he is, had no objections.


This was pretty cool - Julian had made up "chits" with Red 2, Blue 6 and "Command" cards etc that he pulled from this cup to decide which unit went next. The cup is a family heirloom and dates from the aftermath of Waterloo - 1817 or 1819 etc.. It has a number of "frogs" inside it, so that as you drink the contents, the frogs are gradually revealed - 19th century humour apparently!


This is "most" of the table - two farms occupied by the French in the top left and top right - I determined to attack the one in the top right - after all, there was a female figure amongst the occupants! I started from behind the large wood at the bottom of the picture


I deployed my four units of Jaegers into the woods, combining two of them under a leader into a "super unit" of 12 men


The Coureur de Bois and Regulars defending the farm I intended to ignore.


The object of my assault, the farm ers daughter   on the right!


The Jaegers were quickly in action, and drove off one of Julian's units of Coureur de Bois, who were reduced to half strength


It took a few moves but I eventually managed to combine three regular units - twelve grenadiers and two lots of twelve centre company men - into a single combined unit


The Coureur de Bois from farm two moved out to head towards the central woods - Julian had made a similar move with the same troops from the target farm, leaving a single unit of twelve regulars to face my 36 man unit....


Julian activated his unit in the target farm and was about to take the first shot - unfortunately for Julian, I ended up with 4 "Command" cards - this allows you to interrupt and take an additional action out of sequence - which I did! The first volley - I rolled 1 D6 per man, needing 4-6 to score a hit - the twelve grenadiers were classified as expert shots and hit on a 3+. I rolled quite badly and only got 5 or 6 hits out of 36 possible. I then had to re roll the 6 hits, killing a man on a 6 or causing shock on a 4 or 5.


A couple of card draws later, my mounted officer in charge of the regulars came up and the 36 man unit fired again - results above - 6 dead and 8 shock. For every two shock a unit has, one less man can fire - so Julian's 12 man unit was now reduced to two effectives and to add insult to injury, BOTH his attached leaders had been killed!


The two man unit pulls back from the hedge line. Their junior leader had rolled a 6 and rejoined but at a lower grade than before


Meanwhile, in the centre, the light infantry exchanged fire - but not very evenly. Julian had two six man units and I had one six man and one twelve man unit - my superiority in fire power can be seen in the red shock markers on the right hand French unit


Having fired pretty ineffectually for much of the game, the second French regular unit emerged from Farm 2 but they were too little, too late.


My Grade 3 mounted officer ordered the grenadiers to split off from the remainder of the British regulars and take the farm, whilst their colleagues fired long range volleys into the already shaken Coureur de Bois


The Jaegers in the woods added their fire power too and both of the French units were reduced to 50% strength, plus carrying shock markers


The grenadiers enter the farm yard to rescue Ms Alice Munro (Last of the Mohicans reference there!)


A view of "most" of the table at the end of the game, but from a different angle. The French in the target farm (foreground) have been eliminated and the grenadiers are in possesion.


The victorious British commander, Major Duncan Heyward (LotM again).

Another very enjoyable game and we seem to be getting the hang of some of the mechanics although there was still quite a bit of referring to the rules to get things right - and we forgot quite a few things, such as "first fire" bonus for regular units on their first shot, or the "blazing away" rule that means once you fire at a target, you men will just continue to load and fire at it until you use command to stop them! I am enjoying these rules and they have given us two nice little games so I look forward to doing a few more of these over the coming weeks.

Wednesday 27 January 2021

Minor Progress and an Unexpected Arrival

Today when I arrived home, there was a small brown padded envelope of foreign extraction awaiting me adjacent to the painting desk in the garage. "That's odd" quoth I. "I have not ordered anything recently...."

Turns out that Caliver had sent a pack of Crusader Miniatures Dragon Portes Command, that I ordered months ago, along with1 each of Dragons Porte Rifles I and II. They are intended for use as the Latvian Rifle Division, one of the elite units of the Bolshevik forces during the RCW. I chose these early WW2 French figures as the Latvians sported the distinctive "Adrian" helmet but not the ubiquitous French style folded back greatcoats most WW1 French troops are sculpted in. 

However, when the original order of Copplestone RCW figures arrived, the two rifle packs were absent and the incorrect command pack had been sent! The helpful chaps at Caliver have obviously finally obtained the correct pack from their supplier and sent it ex Nottingham on 11 Jan - so only a fortnight to get here - not bad in the "unprecedented" Covid environment! As it happens, I received an email from the said chaps the other day, advising me they now have Riflemen packs I and II available for purchase, so that will be sorted out in the next few days.


I have also managed to get in a little bit of painting time and have completed one test figure from the Assault Group caliver armed Border Militia that will be used as Government troops in our Border Reivers skirmishes. I have to admit, I wish they had a uniform - I would find it much simpler than trying to use my imagination to create something that looks realistic for mid sixteenth century Scottish infantrymen....I am reasonably happy with this one, but what will I do with the second, and the third.... and the twentieth! I will have to do some Google research.....


I will probably use a mixture of different blues for the bonnets worn by 80% of the figures


Stockings will be subdued colours - greys or blues


The tunics and breeches are going to be the challenge - they all have these baggy, multi faceted Landesknecht type breeches, which I will want to make slightly different on each figure....


Anyway, that's if for tonight. I currently have three more Fenrll maids, eight War of 1812 US Militia and three more of the TAG Border Militia in various stages of completion on the painting desk - focus, that's what is required, focus!

Another trial run of Sharp Practice with my mucker Julian tomorrow evening, so should have some insights to share on Friday or over the weekend. 

Sunday 24 January 2021

No Wargaming Figures Were Used in the Writing of this Post!

 My wife and I had a overnight away this weekend (possibly just as well we did it when we did as we have just had a government announcement that there is a probable case of Covid 19 in a woman who returned from Europe at the end of December and then spent 14 days in a Managed Isolation Facility, had two negative Covid tests, went home and then a few days later, felt ill....)

I didnt know where we were going until we were half way there, as she had organised it all. Over the course of Saturday and Sunday, we walked about 30km through lots of beautiful native bush, saw some interesting relics of the gold mining industry in 19th century New Zealand and spent the night in the small coastal town of Whangamata on the east coast of the Coromandel Peninsula.

Here are some pics

DAY ONE - KARANGAHAKE GORGE


View from the start point of the walk looking east along the river - main road to Waihi and then Tauranga on the left


Part of the sign explaining the route and historical context of the local gold fields and railway


Bridge across the main highway which in the past carried a single track rail line


One kilometre long ex railway tunnel


The other end of the tunnel


The track runs for about 5km along the route of the old railway line


A slight detour of 500m led to this nice little waterfall


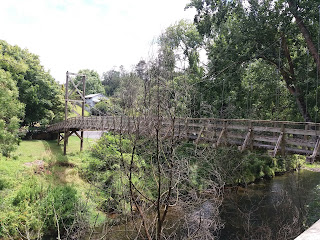
A couple of views of a suspension bridge en route


The terminus of the walk, a 19th century gold battery - it looks very much like military defence works to me!


Final view along State Highway 2 from the bridge featured at the start of the walk. In total we walked about 12km and it took us around three hours.


INTERLUDE - EVENING IN WHANGAMATA


View along Whangamata Beach - the small town can be seen in the right distance


The entrance to the inlet where many boats were moored


Our dinner was a freshly baked pizza al fresco on the main street of the town.


Followed by a nice relaxing evening in the motel with a good book and an appropriately named craft beer - great way to end the day!

DAY TWO - WHAREKIRAUPONGA TRAIL


Dept of Conservation signage at the start of our second walk - today, we did around 18km


More bridges to cross!


My wife remarked that this section of the trail looked like an army trench!


Theses pretty orange flowers - probably a weed - were much in evidence


A much shorter tunnel than yesterdays - maybe 50m in length


Parts of the track were quite a scramble


Slightly disappointingly, the two bridges at the end of the trail are closed


The waterfall consists of three levels, this is the view from the top level down to the middle level


This is the top level of the waterfall - the previous image was looking down to the left from my position here.


Above a map showing roughly the location of the two walks in relation to each other and our home base at Pukekohe - top left. A very do able trip and one we both really enjoyed - around 300km was travelled in total over the two days. We plan to do more of the same in the coming months - assuming we do not have any travel restrictions imposed on us with the latest Covid scare!

Some wargaming content in my next post - promise!