Saturday 30 July 2022

"1914" from Great Escape Games - Friday Night Battle

 "For many are called, but few are chosen" - don't know where it's from, the Bible I assume! Anyway, the relevance is, Julian had issued a general invitation to several players for a Friday Night Bash, but for a variety of reasons, I was the only one who was available.

This meant we were free to do a trial game of "1914", which is basically Iron Cross for WWI. Julian has a nascent Polish 1920 Army in the wings and is planning to use this rule set to pit them against the Bolshevik horde. I, meanwhile, am thinking these rules might quite work well for my Spanish Civil War project, so we were both keen to give them a run through.


It was a small level game, using a scenario from the 1914 book where the British Guards Brigade are defending a river crossing against a larger but less well-trained German force. Julian had three battalions and one field gun, with a total of 9 activation points, while I had six battalions and two field guns with 22 action points. Of the various victory conditions, one was that if 13 bases of Germans or 11 bases of Brits were knocked out, the other side had won.

Just to confuse you a bit, as Julian explained to his wife when she made a polite enquiry in passing, the part of the British is played by Belgians, whilst the part of the Germans is played by RCW Russians! All figures, terrain etc were supplied by Julian - I did bring my own dice though! And some beer. And $20 for my share of dinner :)


Layout at the start - Belgians at the bottom, Russkies at the top of the image


Russian deployment, my plan was to hit one unit holding the building on the Belgian left flank and overwhelm it with sheer numbers, then pivot (the word of the decade, surely?!) to the left and move towards the bridge in the centre of Julian's position


The extreme right of my line with the target building in the distance


Belgian defenders - the figures are by Brigade Games I believe (don't get me started......!)


Some more gratuitous images of the rather nice Belgian figures


The advance began and seemed to go well initially. Each battalion had an attached HMG, so I had poured three guns worth of fire into the building - 9 D10 requiring a 7 for a hit, and for every hit, roll a D6 requiring 5 or 6 for a second hit (such fun!) - and I think after this initial assault, Julian was minus one base of the four-base unit!


The six battalions advance against one, supported by the battery of two field guns on the hill


Julian withdrew his battered troops from the building to the cover of the railway embankment to the rear, to prevent them being wiped out by the concentrated HMG fire


Everything seemed to be going along nicely - and then, we started a new turn, and Julian won the initiative. His unit moved back into the building, and succeeded in activating three or four times in a row (first activation is free, second you need to roll 2+ on D6, third 3+ on D6 etc)


In three or four rounds of withering fire, he rolled 6 D10 each turn, requiring only 6 or better to get a hit. For every hit, he then rolled a D6, where a score of 3 (HMG) or 4 (rifles) inflicted a second hit (easier when the target is in the open, of course). 4 hits removed a base from a battalion. Above and below are the results. Meanwhile, I attempted to interrupt and fire first, only requiring a 3 on a D6 - and rolled a succession of 1 and 2! I was starting to feel a lot like Rick (our renowned bad dice roller)


To add insult to injury, Julian advanced a unit on his right flank and used one of the three command cards we each had to take a second free move, bringing him within range of my field guns. Very soon, they had also been swept from the field - bloody hellfire!


Above, the state of my forces after Julian had finished mowing them down, and below, the butchers bill.....!


We broke for dinner, and I must admit I was pretty despondent and muttering darkly about how hard it was in the open against HMG's. After three quarters of an hour or so, we returned to the fray, with both of us suspecting the game was not long for the settling, however....


I had only lost a couple of actual full units - 1 battalion and the gun battery, so my 22 activation points were reduced to 18. Julian, I think still had 9 at this stage. I lined up my HMG's (they can be detached from the parent unit and moved separately) In two or three activations, I obliterated the remnants of the battalion in the building that had caused me so much pain, then, I moved one full unit plus an extra HMG into the building, and was in a position to pour fire into the adjacent building, wherein there were a couple of companies of Julian's third battalion The rest of the force wheeled left and concentrated a large volume of fire on the Belgian unit who had taken out my artillery, the hunters had become the hunted!


Having lost a unit, Julian was down to 7 activations v 18, which made it pretty hard for him, and fortunately for me, I found some luck with the dice, rolling 4,5 and 6 for repeated activations when I needed to, which allowed me to fire on Julian's beleaguered unit multiple times without response in the other direction.


At the end of the turn, we had a count up. I had lost 11 bases (13 required for a Belgian victory) but Julian had lost 11 - which meant my assault had succeeded -Urrah!!


Well as they like to say in these parts, that was certainly a game of two halves - the All Blacks could learn a thing or two from my Russians about perseverance :) 

We both thought the rules worked well, being successfully engaged in the open is very costly, but then, it should be really. There were some odd things in the rules that we will check out and consider changing e.g. max move for infantry is 8" but max rifle range is only 12"?? We changed that immediately, as it does not seem logical - what do you think? The other very odd thing is, there do not appear to be any close combat/melee rules...Shome mishtake, surely??Anyway, Julian is in charge of rules, I don't worry myself over such trifling matters, so he will pop onto the 1914 forum or whatever and see if he can get to the bottom of that conundrum before our next game. 

Overall, I like the rules in this era just as much as I like them for WWII. There are some strange things that happen (and it could be we just didn't read all the details in the rules properly) e.g. when activating, you calculate the score required by looking at the number of previous activations PLUS the number of casualty hits being carried - so a unit that's been activated twice and is carrying 2 hits, for example, would need 4 or better BUT if that unit had suffered 4 hits and lost an entire base, the casualty markers go with it, so now, it is easier to activate, as you only count the two previous activations, and roll a 3+ to activate.... seems a little bit counter intuitive - but as I say, maybe we got that wrong and removing a base adds a permanent plus one or something....

Next time, Julian wants to give an all or at least majority cavalry clash a try - it will be interesting to see how that works out!

Thanks for dropping in for a wee lookie and hope you enjoyed the AAR enough to leave a comment :)

Thursday 28 July 2022

Caballería Republicana Española

A few less images on this post than the previous one - 7 compared to 89 I think! 

These are the eight 20mm Republican cavalry figures recently arrived from the UK courtesy of Irregular Miniatures


The whole unit - I removed a sabre from one figure to create the standard bearer


Four figures are the same pose, so are grouped together


I converted this one into an officer before I realised, the one after the standard bearer is probably supposed to be an officer!


The flag is just one of three generic "Spanish Republican" flags I pulled off the net via Google


Possibly an officer, although he has a rifle, so maybe not??


Comparison with one of the Minairons cavalry - I think they work pretty well together.
Off for a game of Iron Cross 20mm WWII at Julian's again tomorrow, so an AAR will follow over the weekend.

Sunday 24 July 2022

"Turning the Flank" An ACW Scenario

 OK this, my friends, is going to be a BIG post - and not because I am about to write anything deep and meaningful! Our Sunday game involved around 40 battalions per side plus cavalry and artillery, and ran for about six hours almost non stop. 

There was a lot of action and a lot of very nice figures on the table (none mine I hasten to add, so I cannot be accused of a partisan judgement on that score!) As I saved the images from my phone to the laptop to do this blog post, I noted with some amazement that there is a total of EIGHTY NINE (89) pics of the game. 

So, a brief outline of the scenario. Rick started the game on the table in command of a Union Cavalry Brigade. The rest of the Union players - Adrian, Julian and I - rolled to see where we would arrive (by road only). For the Rebs, Nicks started on the table and Paul, Mark and Chris arrived on move one. The Union reinforcements arrived on move two. 

The basic idea was, Ricks Brigade was the farthest outpost unit on the left flank of a larger Union Army. The Rebs were attempting to outflank the army, and Julian. Adrian and I commanded forces dispatched pell-mell by the Union commander to hold the line on his flank and prevent the Rebs from turning it.

So on to the picture fest - I may not add a notation to every image - I will see how I go!


I entered by the central road, with three brigades and a couple of guns. Ricks position was to the top of this image


Ricks cavalry brigade was allowed to deploy anywhere inside the area marked with the yellow dots


A couple of "eye candy" shots of Nicks beautifully painted Confederates


First blood to the Union!


Tha cavalry redeploy to meet the Rebel advance


On the other flank, Reb cavalry commanded by Mark spur forwards


My three brigades split off in different directions to hold the vital crossroads


The Rebs advance on all fronts!


From the far road to our extreme left, six brigades, commanded by Julian and Adrian, arrive on the table


Three units of Nicks Confederates blast one hapless cavalry unit


One round of firing - and they went to the worst possible grading - shaken with 6 casualties!


Union dispositions to face the Rebel advance from our right, cavalry picquets backed up by one of my infantry brigades


My second brigade faces ahead, as the third scrambles to take up position on their left, sheltering behind the fence line, and countless Confederate infantry hove into view1


Paul's massed Rebel infantry move up to reinforce Mark on their right (our left) flank


Massed Confederates 


My brave Union boys are in position to take on the advancing host!


Rebs on our right flank clash with the cavalry picquets


In the centre, Chris's juggernaut slowly shakes out into attack formation


While to his right, Mark and Paul close in on Julian and Adrian


My brigadier directs deployment of his brigade as Paul's troops appear in the distance "Line the fences, boys, and give 'em hell...!"


As Chris's troops gradually draw close to the centre of our position


The cavalry picquets await Nicks advance


And here it comes! Mark has made an interesting change to his "skirmisher" rules. The attacker cannot put actual casualties on skirmishers. If an unsaved casualty is scored, a white marker is put on the unit. If a second white marker is caused subsequently, the skirmish unit can retire. When it retires the white markers are removed. In this way, skirmishers can be a nuisance but can't hang around for half the game, causing damage out of all proportion to their size. It seemed to work very well. The only way to "kill" skirmishers is catch them in hand-to-hand combat - but generally, they will always fall back before the attacker has an opportunity to do this.


My third brigade now fully deployed on the fence lined roadway - and not a moment too soon!


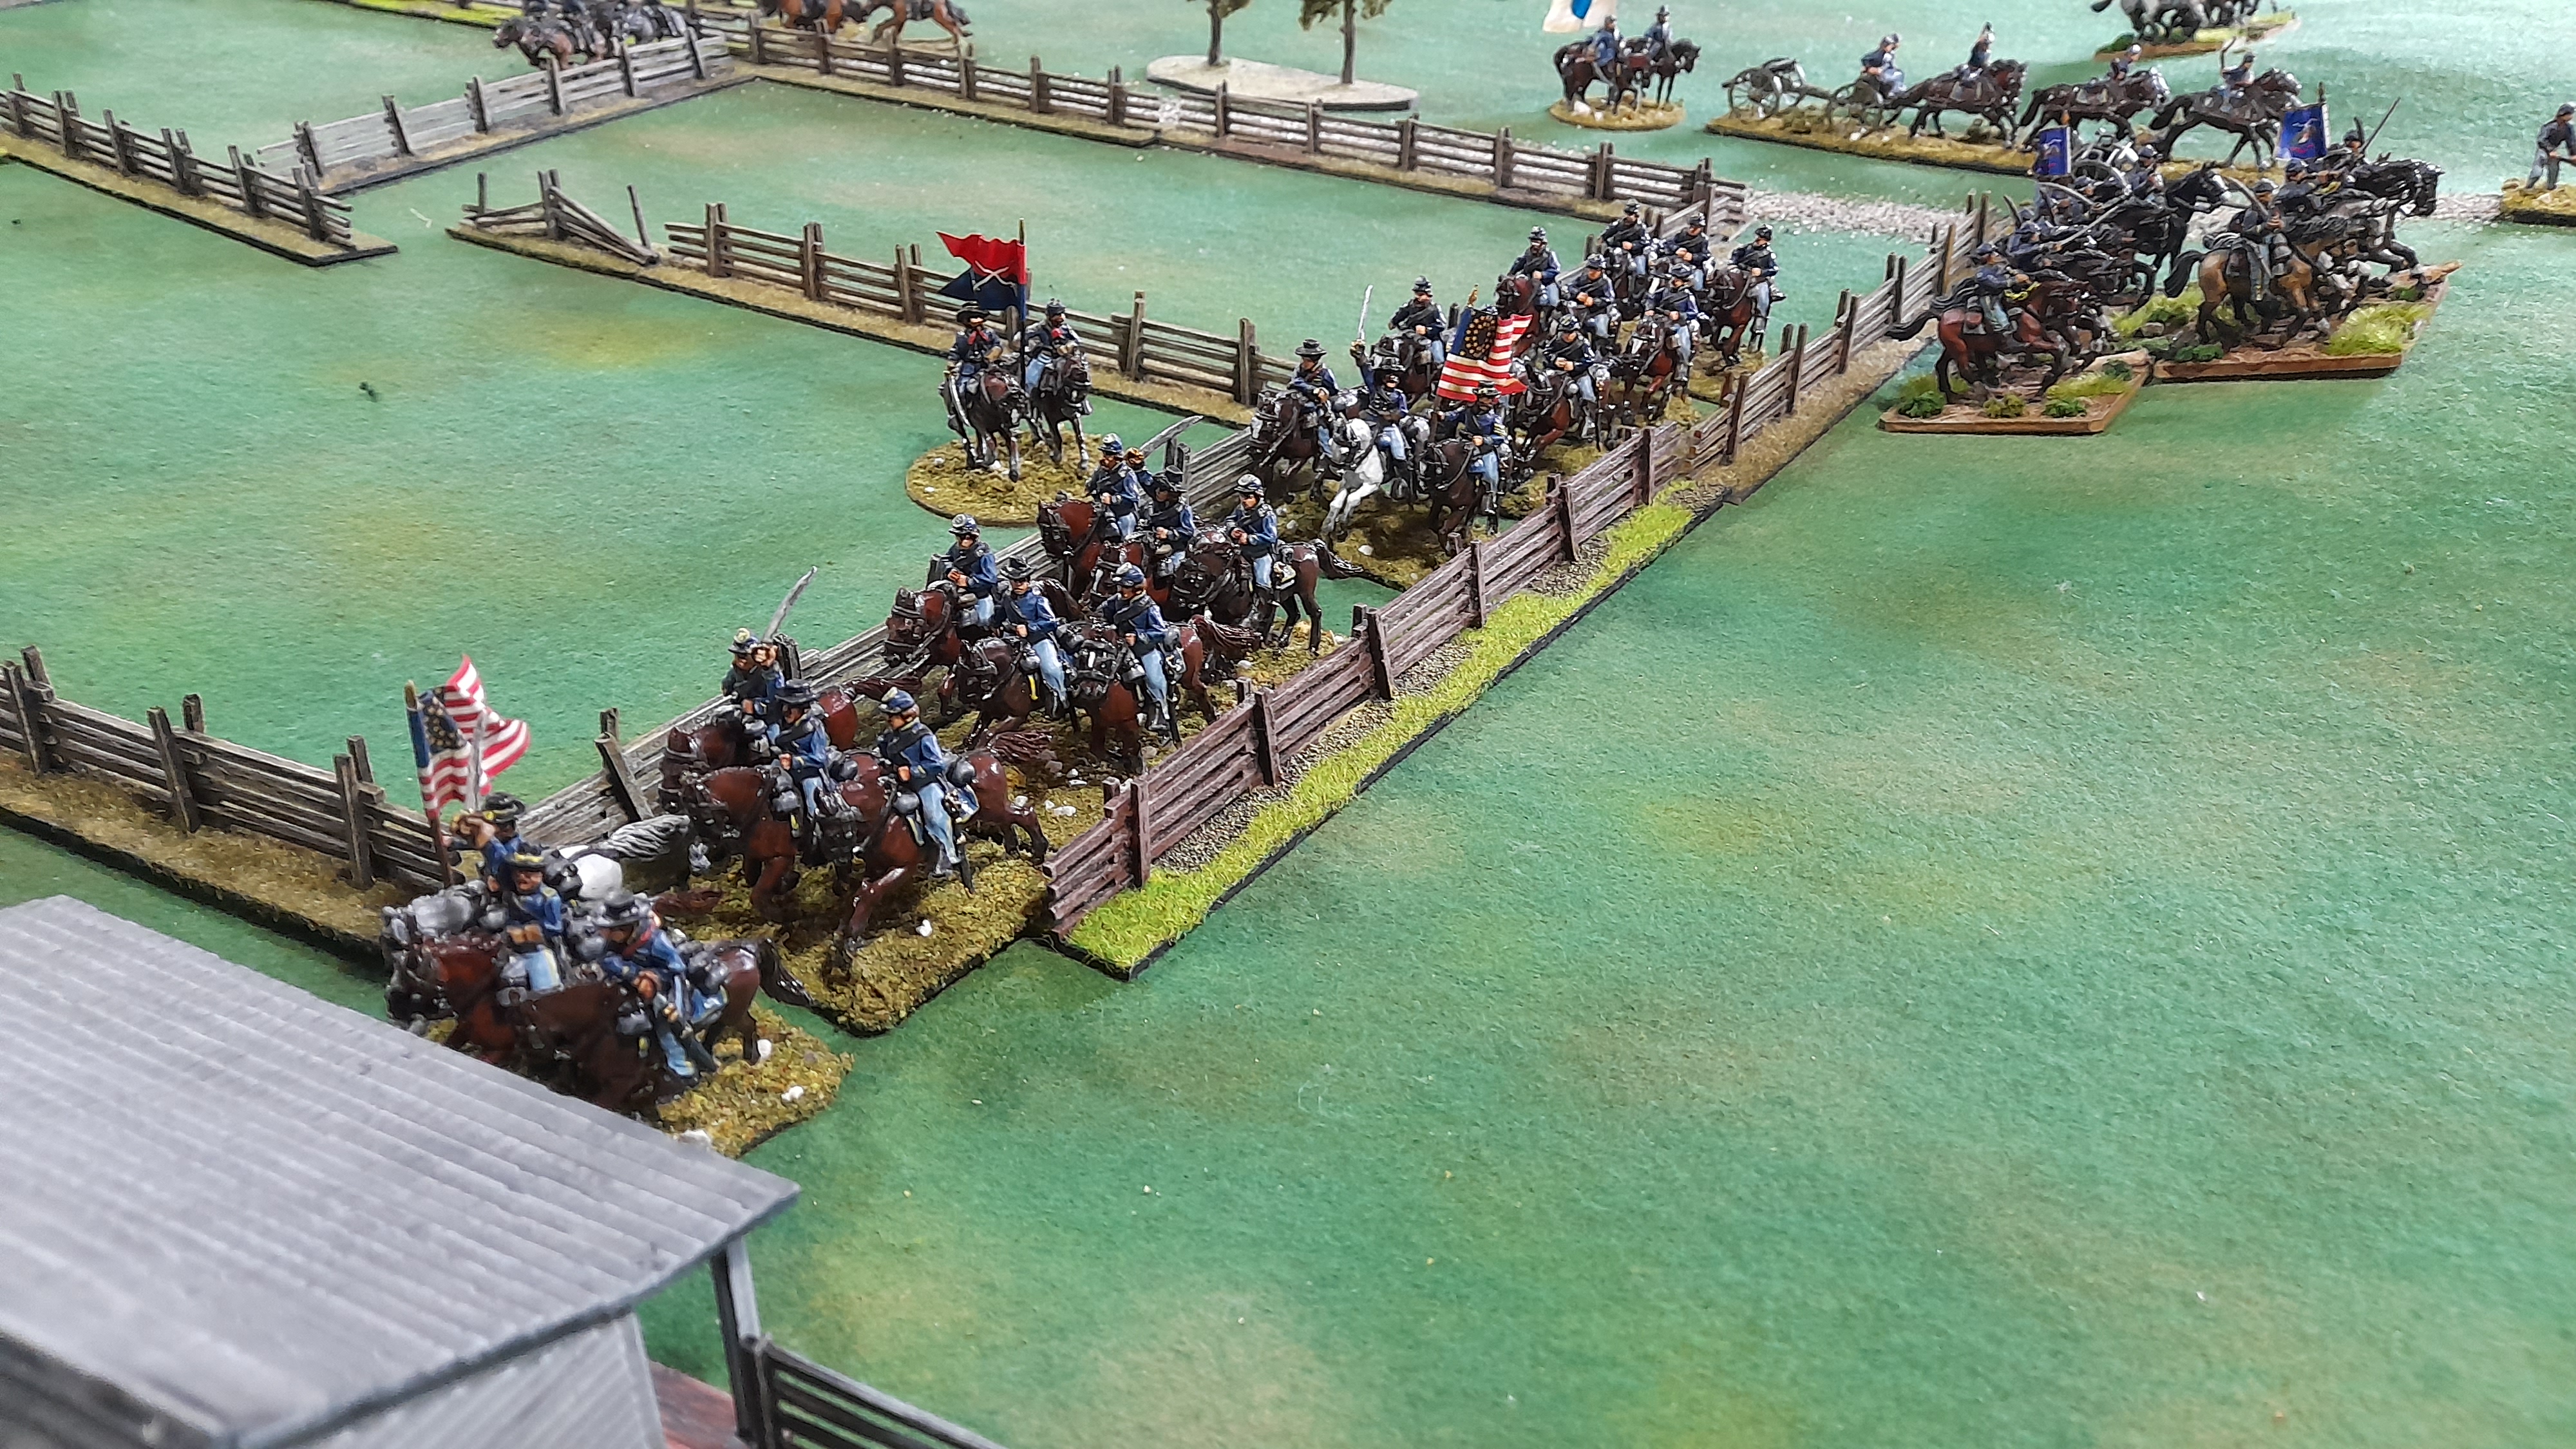
The cavalry remount and retire as Nick marches forwards towards my first brigades' positions


Nick finished off Ricks horse battery


One of Nicks brigades attempts to push through against my first brigade


Adrian deploys his infantry to counter Marks Reb cavalry...


......while Julian advances "to the sound of the guns"


A thin grey line of Paul's Rebs deployed against Julian and Adrian


My two brigades in the centre face Paul (above) and Chris (below)


And Nick on the right flank (above)!


As reinforcements stream in from our left flank


Adrians infantry deploy to push back the cheeky Reb horsemen


Chris continues to deploy in the centre


And Nick advances to meet him as the cavalry brigade pulls back towards my position in the Union centre


The centre from the Confederate perspective


Dismounted Reb cav make things hard for the Union infantry on our left flank


Our esteemed host Barry in appropriate attire!


The cavalry beats a hasty retreat through my lines


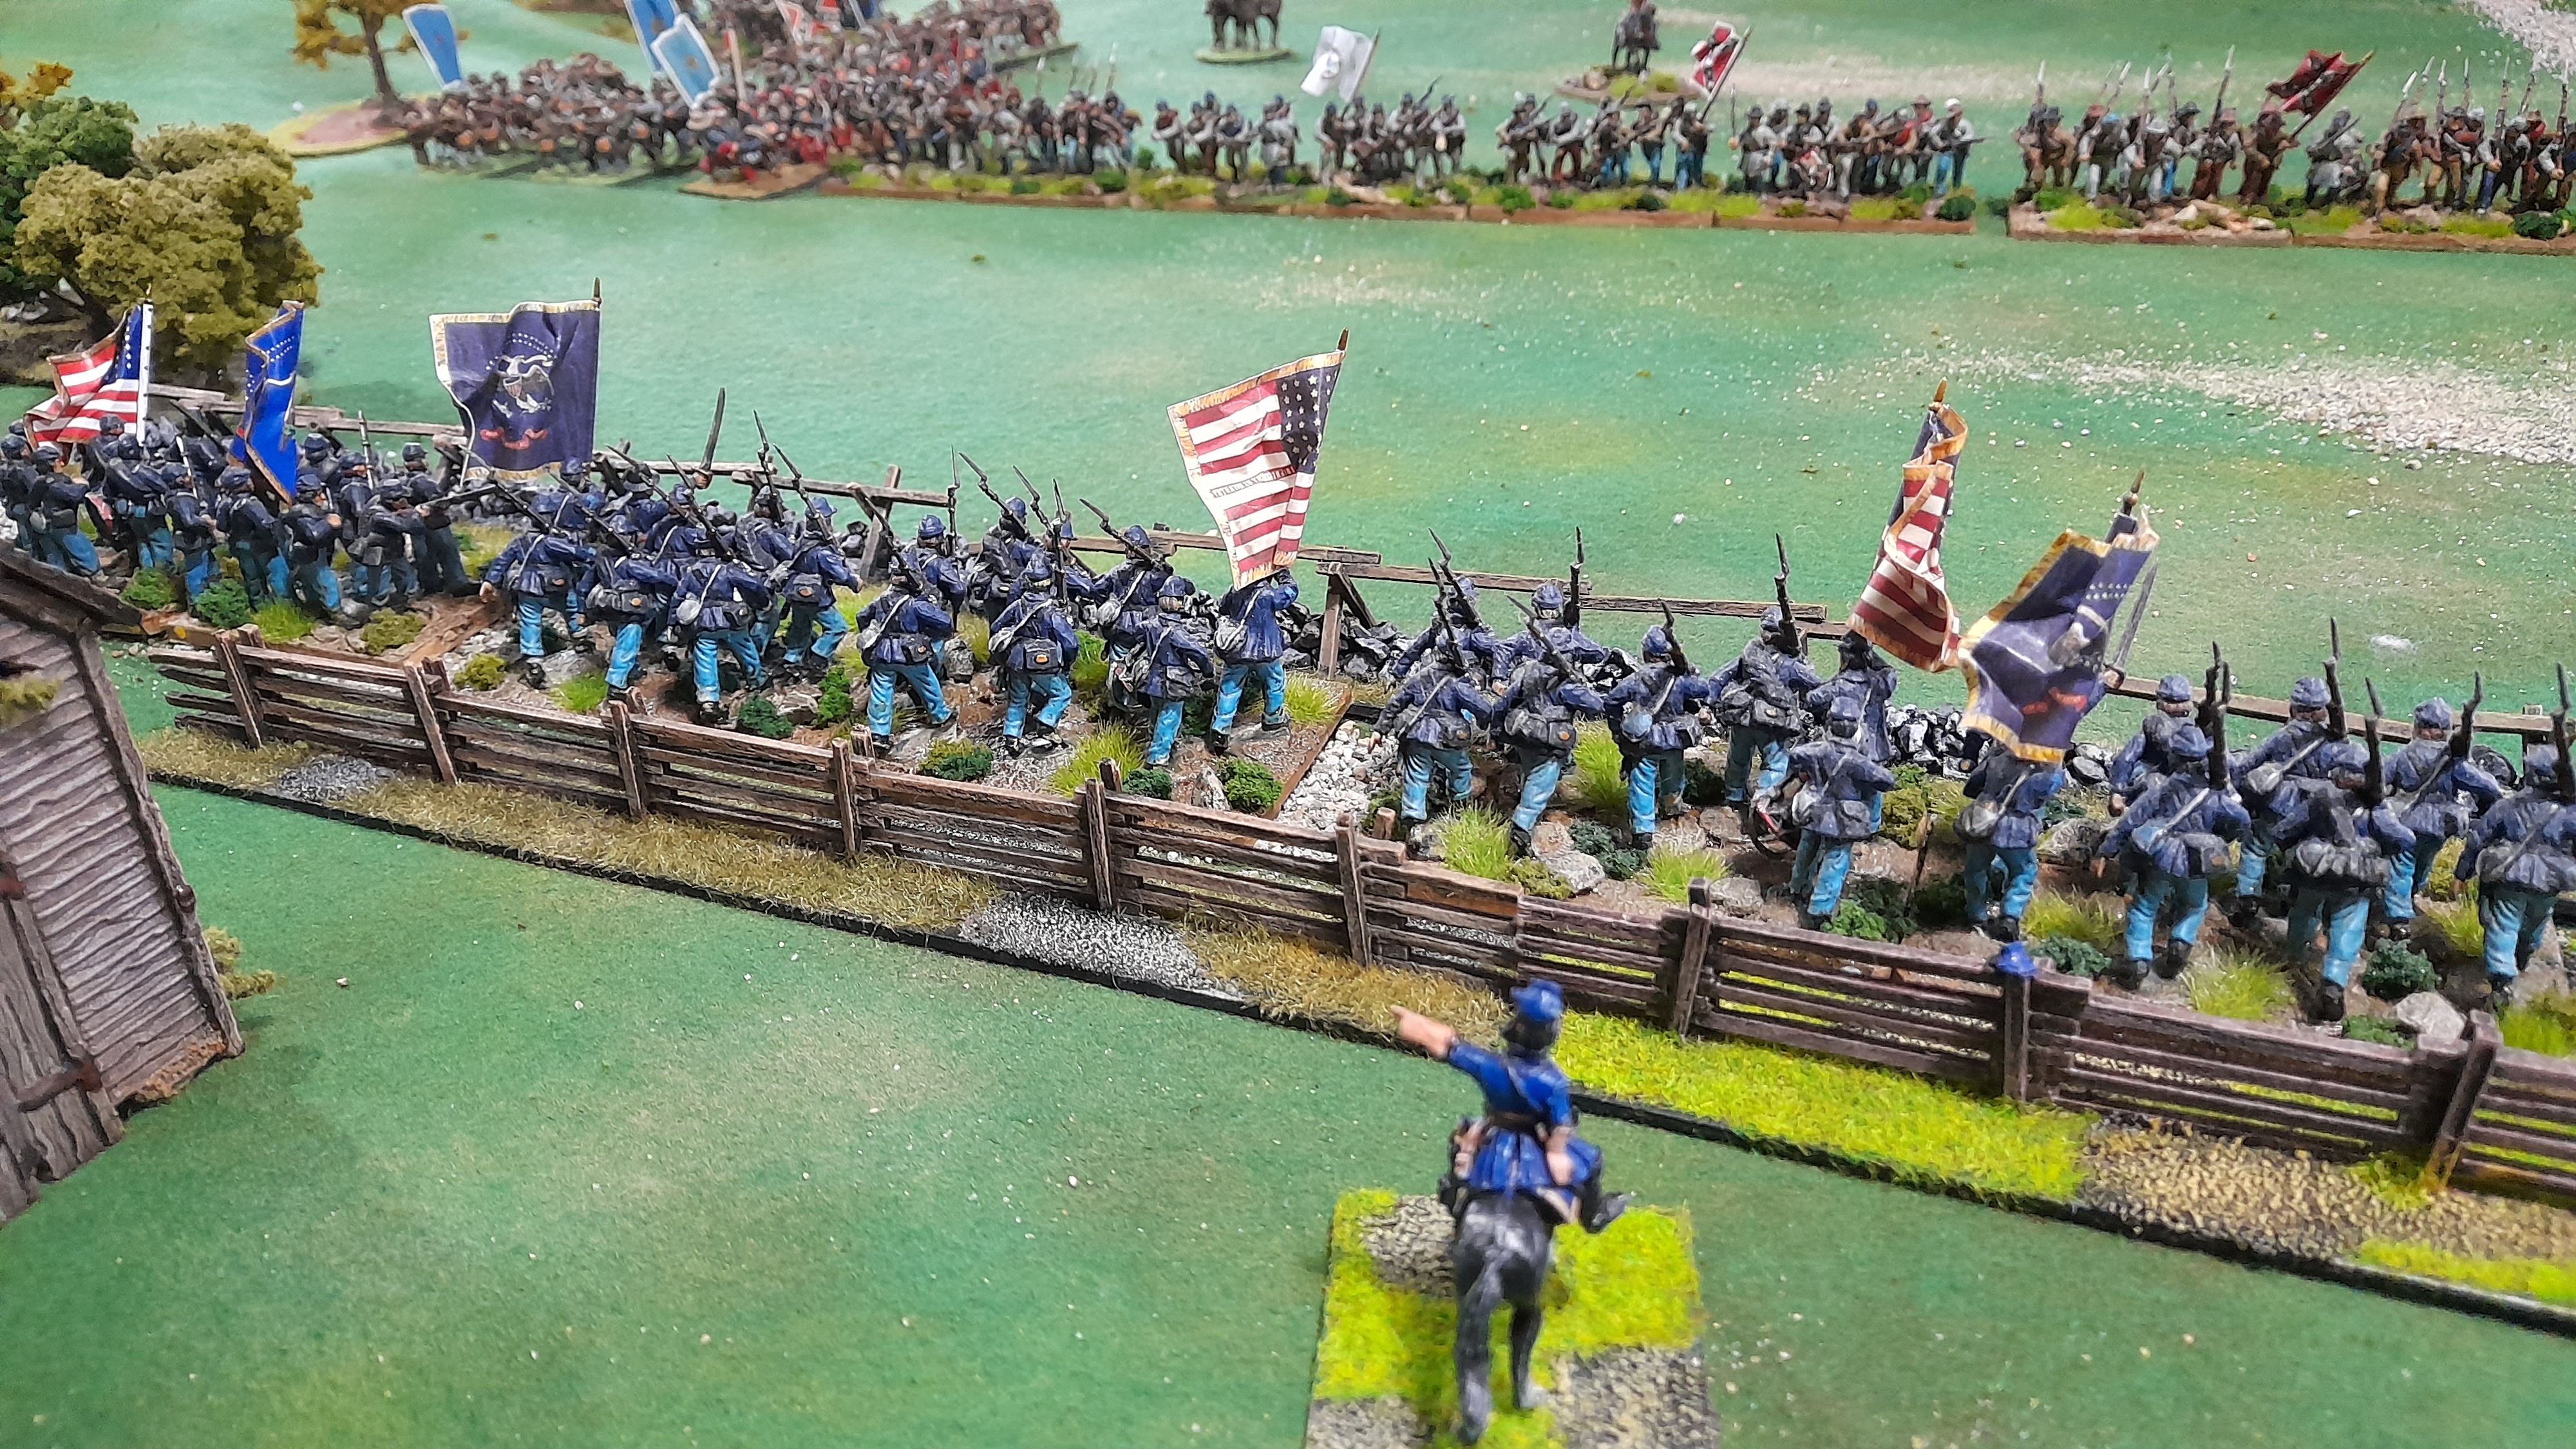
As three battalions advance over the fence line and take the fight to Nicks Rebs


There are an AWFUL lot of Rebs out there, Billy!


Cavalry picquets and their horse holders still playing a delaying role against Nicks forces to our right


Nicks gun battery on the high ground looks down on a target rich environment - fortunately for me (in particular) they did not seem to have their eye in today!


Action on our right between Adrian/Julian and Mark/Paul


The Rebs are almost at my line in the centre of the field


And the casualties start to mount on both sides


My right flank brigade pulls back to the road they entered on, with Julian's reinforcements in support to their rear


A couple of general views of the centre of the table


View down the length of the field from Julian and Adrians end (our left flank)


Paul's assault on Adrian above and me below


Action in the centre viewed from the Rebel side of the table


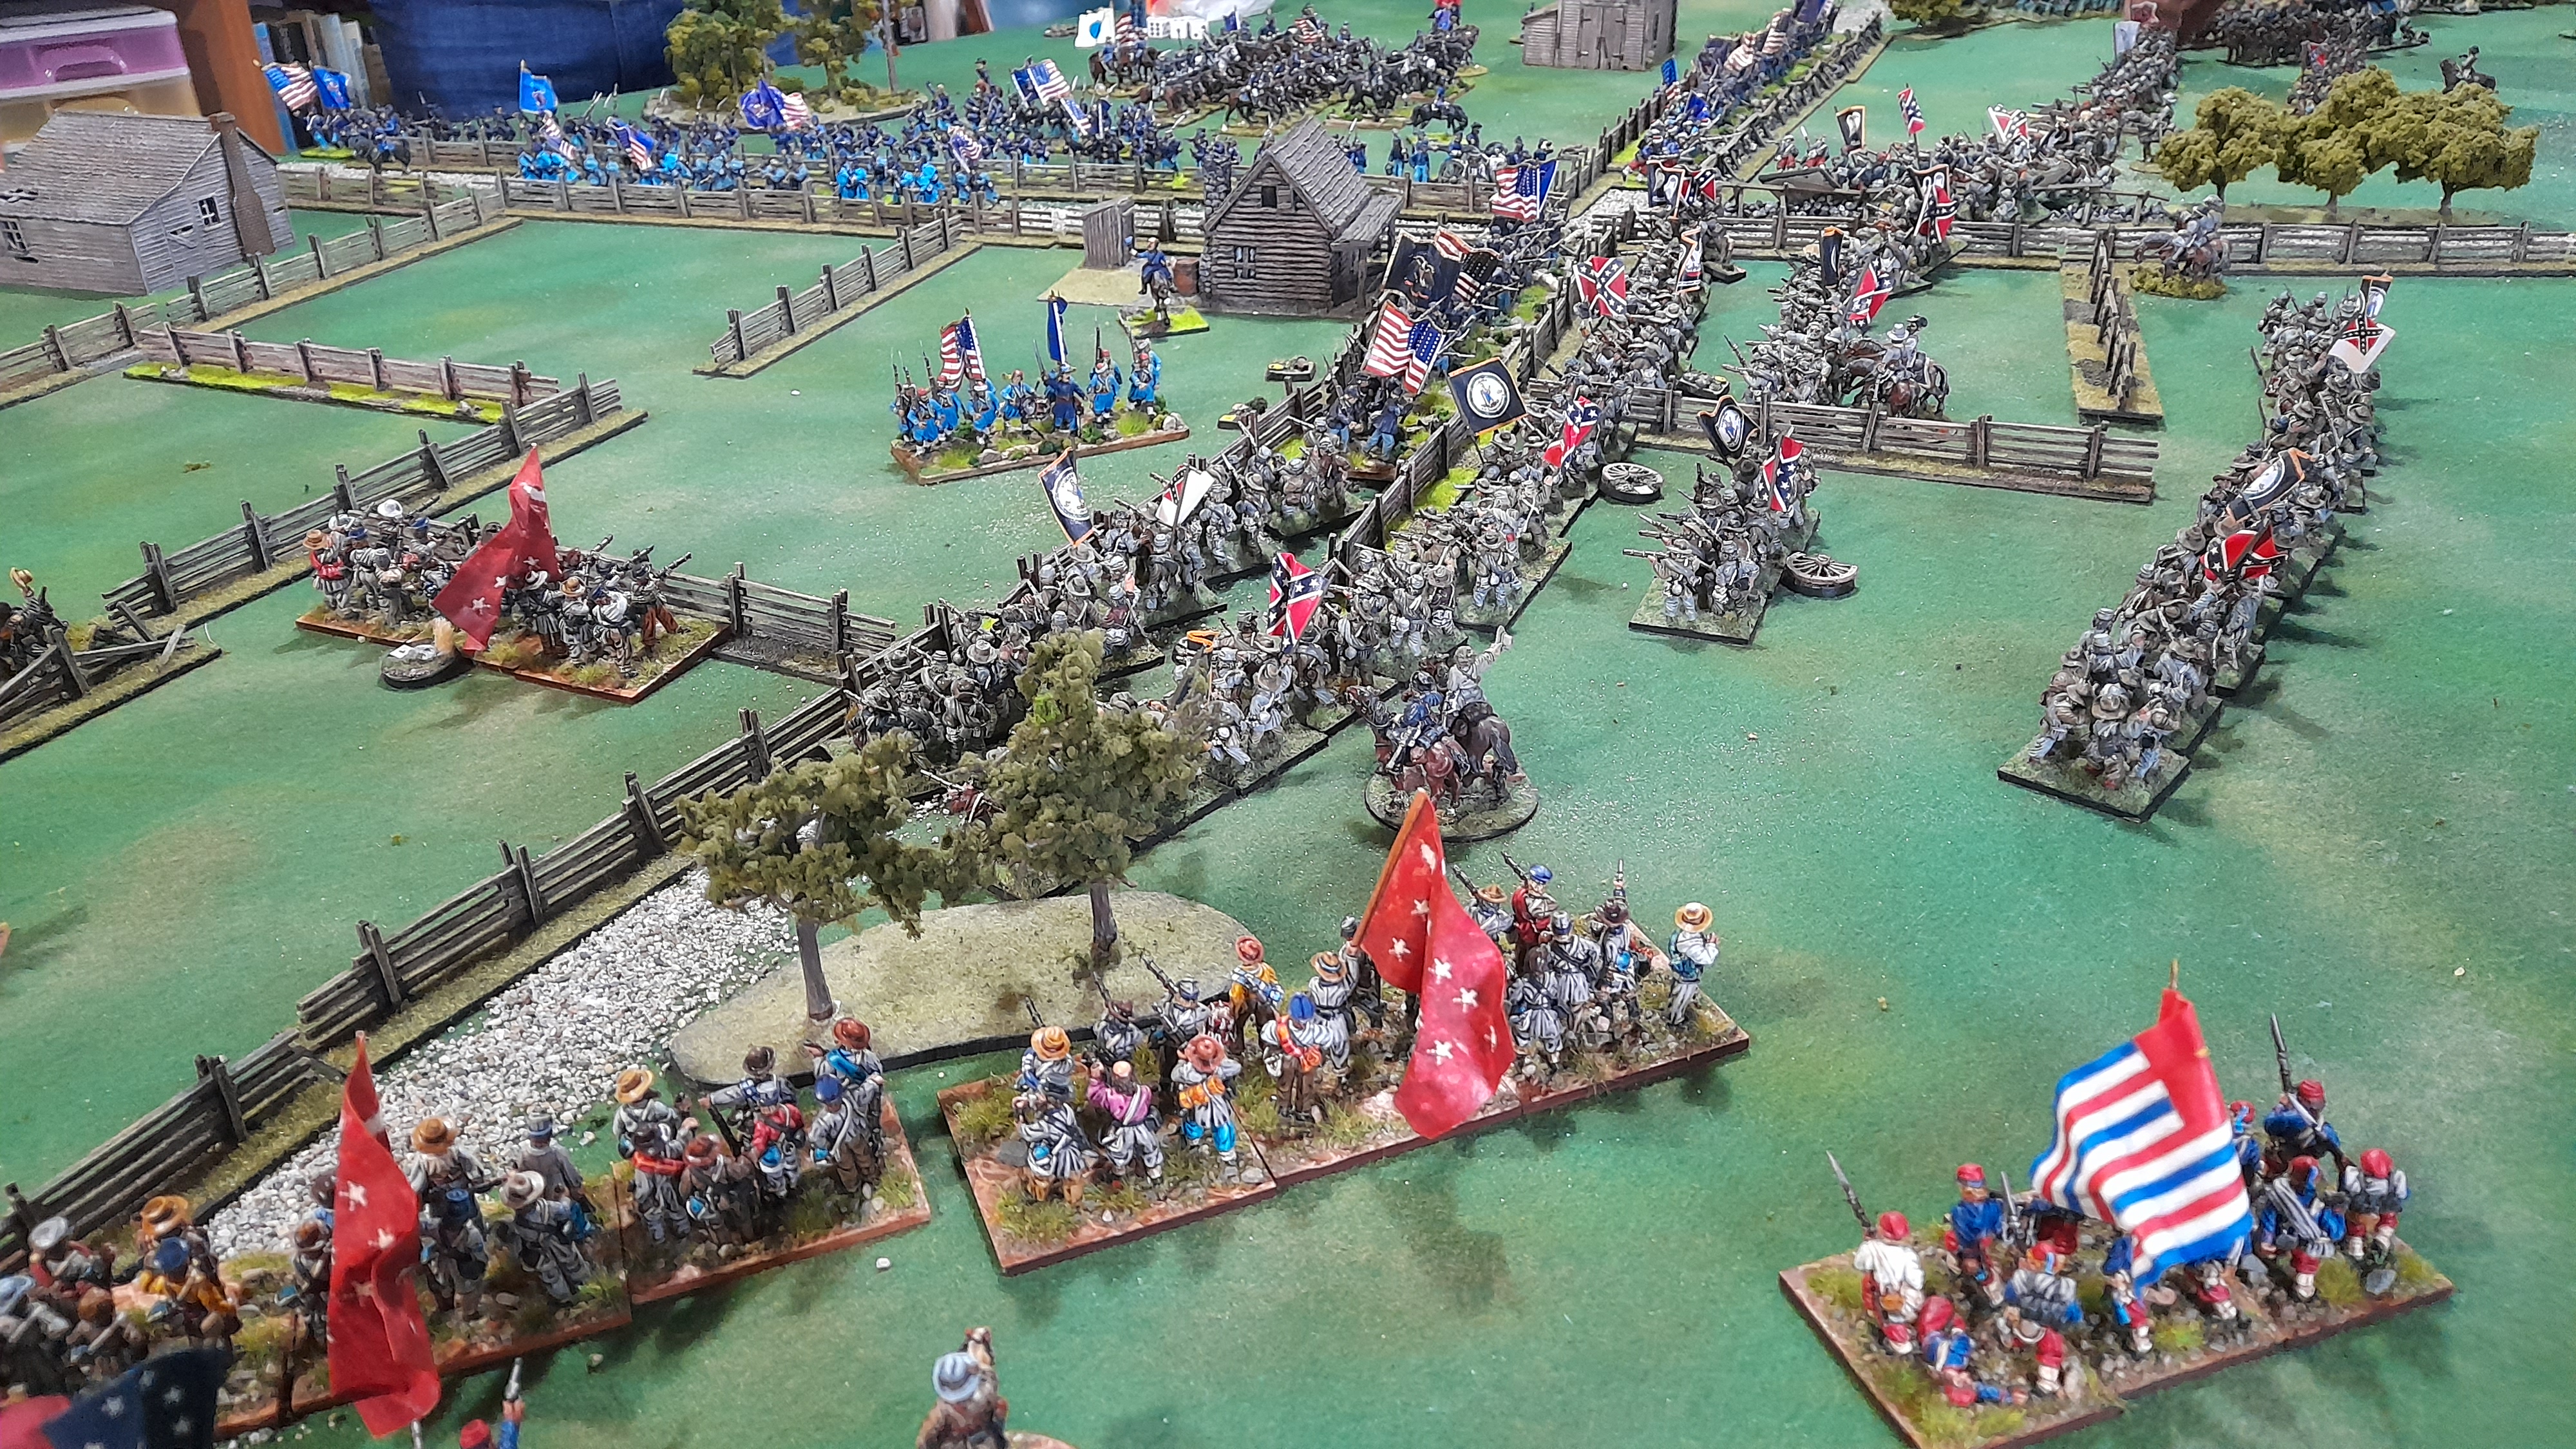
The fight for the crossroads was hot and bloody work....


.... but gradually....


.... the superior Confederate numbers started to tell


The clash at the crossroads


The brigadier points out the blindingly obvious tactical problem! Thank you, Sir!


Fight on the left between Paul and Julian


Now the Rebs charge the guns.......


As Chris and Nick combine on our right flank 


Julian moves to plug the gap in our line


And the gunners win the fight, destroying another Reb unit


More "eye candy" shots of Nicks troops advancing


The remnants of my first brigade line the road to meet Nicks advance


The Union cavalry charge in the last turn of the game!


And this is where we called it.

Phew, that was fast and furious for about five of the six hours play - a great game thanks to Marks well thought out scenario. We had more or less fought each other to a draw - that was Marks analysis anyway - and he was the "umpire" as well as playing a supporting role in charge of the Confederate cavalry. 
I would have put it at maybe 60/40 in favour of the Rebs, but it could still have gone either way - and given the strategic aim was to turn the Union flank - the Confederates were still some way off from achieving this, which is why Mark adjudicated the result as he did. 

I hope you have enjoyed reading about it as much as we all enjoyed playing in it. It's one of the best "big" ACW games I have been involved in to be honest - I quite often find them a bit unsatisfying, but this one was a goodie!

Thanks for taking time to work your way through all the images and extra special thanks to everyone who leaves a comment!