Sunday, 24 February 2019

28mm Frigate Update

As mentioned in the last post, the worst part of this task is now upon me - painting the completed model!

I have made  a fair amount of progress on this, considering I only started work at about 3pm and finished off about 930pm. I still have some tidy up work to do and detailing to add, but the back of the job is definitely broken. The frigate is certainly not "all shipshape and Bristol fashion" yet, but she is well on the weigh....!

Will have a few days off now as we are entertaining a couple of friends from the UK for a couple of day, but hopefully by next weekend, my ship will be fully commissioned.

Above - ships company of Old Glory Royal Marines deployed on board

Two general views of the ship, with the bow spit included this time,. but minus the steps, which I have not painted yet...


Old Glory female pirate with whip - just because I have the figure!


Saturday, 23 February 2019

28mm Frigate Update - Almost There! 


I have omitted to take pictures through the week as I gradually progressed the 28mm frigate project, but I have done quite a bit of work on it today, so I remembered to take some progress shots at various points.

I think I am more or less finished now, apart from buying ten naval cannon for the top deck (in the end, I have just represented the lower deck guns with dowel)

I am pretty pleased with how the ship looks at this stage but the biggest challenge is yet to come - painting the bloody thing! And doubtless, after all this time and effort, it will only ever appear in two or three games - oh well, c'est la vie!
Where I started the day - very fiddly work drilling small holes to hold toothpicks...
Work I did earlier in the week - added guns, open gun port covers, bracing inside the upper hull and a strip of balsa along the top on each side


I also made three sets of steps so the crew can gain access to the upper deck areas


Another angle on the same view but several hours later when all the railings have been added!

This is what I spent several hours doing today - adding railings around the fore and after decks.

Whilst in between, I cut and glued the cross beams onto the three masts

I am pretty happy with the end result - and yes, I do have the forward spar, I just forgot to put it in place for the photo session!

I have a few little touches to add - round decorations at all the corners of the railing, a flag pole on the stern etc - but fundamentally, I think this vessel is now completed

Sunday, 17 February 2019

28mm Frigate Update - Work in Progress

I have been away most of the week for work so have not made much progress on either painting or ship building!

Here are a few images of most recent advances on the 28mm Royal Navy frigate I am working on ….

Here is the basic frame 

A view from above

Dry run through assembly showing the three masts
Detail of the rear captains cabin windows I added this evening.

As you can see from the last image, I have put a lot of the constituent parts together now - including gluing both hull sides into place. As mentioned, I have cut a line of gun ports along the hull, 15 per side I think, plus 5 per side on the upper deck, making this a 40 gun frigate! I am toying with the idea of buying genuine model ship guns from a British supplier but I may just end up using dowel for the ones poking out of the hull gun ports...….


Friday, 15 February 2019

Wings of War/Wings of Glory

I think the former is the original name for this card based WW1 aerial warfare game, whilst it is now marketed under the latter name.

Anyway, we had a game of this a few days ago, amid much hilarity. For those who have not seen/played it, you basically have a deck of cards specific to your aircraft type, and pick three cards each turn, to play in a specific order, determining where your aircraft will go. As no one knows what other players have selected, this can have interesting outcomes when the aircraft are in close proximity!

Initially the two sides are closing on each other, but of course pretty soon it turns into a dogfight and that's when the card picking can have some amusing results - in our four games (which the Brits, Chris and I, won 3-1) we had multiple instances of collisions - John even managed to collide with himself (we had two aircraft each)

I cant really remember the details of the games now but here are some images and if they jog my memory I will add some comments!

One of my aircraft in game one - Julian has bought some very nice commercially produced gaming mats over which to play

Two British aircraft in line astern over the trenches

One of the packs of cards used to decide what movement the planes will make

The Brits gang up on my Little White Fokker....

But the Red Baron comes to my aid!

Then heads off in the wrong direction....

Two Brits collide as I swerve past their rear!

She's back - the Red Baron returns to the fray

This may have been the start of game two - the multi coloured aircraft was my new addition...

Six of the eight combatants in one shot - the other Brits were so slow they are not even in sight!

Manouvres over the enemy front line

Two collisions ensue as I fly sedately by...

Two brits collide - very nearly a three way event!

The ultimate - Johns two Brits collide with each other, Chris collides with Julian and my Little White Fokker glides between the chaos!


Saturday, 9 February 2019

Royal Navy in 28mm

I am not sure if this Brig is finished yet or if I will do more to it - but I was overcome by a desire to post progress on line, so here are some images, including an Old Glory female pirate to give an idea of scale.....

The wooden decking was copied off the net and printed in colour then cut to shape.

Four small guns were made from thin card and small bits of kebab skewer


The rear decoration is rubber anti slip mat painted black then highlighted with gold.


Following are some images of Work in Progress over the last week.....


 In the end, I decided to use the same layered card technique on the lower hull to give the impression of caulked planking


Inspired by the success of this project but underwhelmed by the size of the ship, I printed off the plans again on A3 paper, then extended the length of the hull a bit, and started work on a Frigate, which will have three masts rather that two. Below is an image of progress on this vessel so far...


This image shows the relative size v's the original plans - quite a bit bigger!


The lady pirate in use again to give an idea of the scale of the frigate. The hull profile has been altered a bit as well and I will cut gun ports along the full length of it so there are maybe twelve per side plus some more on the upper deck.

Saturday, 2 February 2019

War of 1812 or Napoleonic Brig

Today I have basically spent the entire day working on this ship. I started about 7am and finished about 10pm. In between, I went out for breakfast with my wife for a couple of hours in the morning, ate dinner then watched the news 545 - 630 pm and took the dog for a walk at Kariotahi beach 7pm - 830pm.

The rest of the time was spent on this master piece - tomorrow, I may get a chance to undercoat it!

Thanks to Gary Chalk who created the templates used to build this ship

Above - Original illustrations from Gary Chalk's article

The plans that were part of the article - I glued these to thin card then cut them out for templates - so I can create a sister ship if required.....

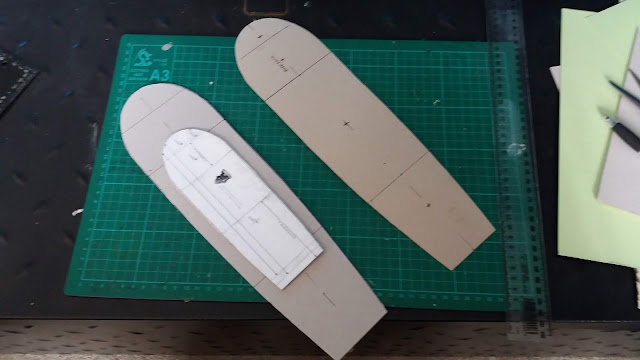
The templates all ready to go about 730am Saturday morning

I realized I needed THREE of the deck shapes - one for the base, the second for the deck and the third for the quarter deck, foredeck and prow sections.

This looks very similar to one of the illustrations in the original article - which I took to be a good sign!

Holes were aligned through upper and lower deck to ensure the masts would be perpendicular to the deck.

Dry run assembly before applying any PVA glue....

I used plastic clothes pegs as clamps to hold things in place while the glue dried. Masts are going to be created from kebab skewers, as I thought dowel was a bit too "Chunky"
About fifteen stages and eight hours later - this is how the vessel looks at the moment

From directly above.....

From a side angle....

...and with the two masts in position. I used some thin string I had to bind around the join between the upper and lower parts of the two masts. I made mine slightly shorter than suggested in the plan because I thought that worked better aesthetically.

My plan now is to paint the ship up in black and yellow a la Royal Navy circa 1800-1820. I have checked several images and decided that the hull and masts will be yellow, with the spars and fighting tops black. On the hull, all the beading is also black.  I think the model has come out pretty well and I just need to make sure I take time to get the paint work right!