My turn to run a game at Barrys, and with Rick champing at the bit to get his lovely 1940 British and French 28mm forces into action, I came up with the idea of a scenario based on the British armoured counterattack against Rommel's 7th Panzer Division at Arras in May 1940.
I found several scenarios online including this from an Orkney Wargames blog!
Arras, 1940
The scenario focused on the British tank attack south of Arras on 21st May 1940, and pitted a force of British infantry tanks (Matilda I’s and Matilda II’s) against a column of German Panzer grenadiers – all from Rommel’s 7th Panzer Division. When the tanks broke cover and crossed a railway embankment the Germans were spread out on the road, and for a few turns the British had a field day, machine gunning trucks and their occupants before the Germans could react.
___________________________________________________________________________________
I spun the map around 90 degrees to better align with Barrys table and included the French in the attack. Rick really did not have enough of the British tanks required, so let's say it was more "loosely based on" or "inspired by" the historic action - but I managed to include most of the elements - Rommel returning to the battlefield and managing to arrange an ad hoc defence by AT guns and artillery firing over open sites, the use of 88mm Flak guns in an AT role, the ineffectual British artillery support, the return of elements of 23 Pz Regt to help their beleaguered infantry colleagues and finally the arrival of the Luftwaffe, in the shape of Stukas from I and III Gruppen, Sturzkampfgeschwader 2.
This was my re interpretation of the previous map.
As the game starts, the British tanks move forwards against the unsuspecting flank of Abteilung I & II, 6 Schützen Regt.
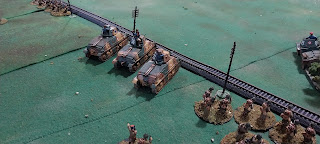
MG armed Vickers light tanks
Matilda II tanks with heavy armour but an underwhelming 2lb main gun
The French can also be seen in the far distance, near the woods.
The British opened fire - with absolutely NO effect whatsoever - so much for " the British had a field day, machine gunning trucks and their occupants before the Germans could react."!
The German column raced along the road under fire!
As the French ponderously advanced at the other end of the empty battlefield
The Landsers of 6 Schützen Regt. debussed and swung their PAK and artillery guns to meet the armoured threat.
In the exchange of fire, most of the German units took hits, but one Pak 36 knocked out a Vickers.
The French infantry deployed in cover of the railway, whilst their amour advanced cautiously through the woods
6 Schützen Regt decided to take the fight to the enemy, and whilst their 75mm leichtes Infanteriegeschütz 18 knocked out a Matilda (!), the infantry advanced. To help them, Rommel arrived on a special event card, and this allowed all German units to remove up to two hit markers each! (He is an inspirational leader, you see!)
Meanwhile, the German transport moved towards cover, away from the British fire power.
The right flank of the British, at the junction with their French allies on their right
Allies on the left, Germans on the right - the latter still have very few forces on the table!
Around turn 12, the second special event card allowed two rounds of off board artillery support for the Germans, and two more Matilda's were taken out of the fight - this isn't going how we expected, early on!
The British infantry gets into a flanking position and put some hits on one of the German infantry units. They also received a special event in the form of one round of off board artillery but consistent with statement I read saying that the British artillery performed very poorly in this battle, their fire had zero effect!
Meanwhile, the Wehrmacht infantry is attempting to engage the Vickers light tanks in close combat!
The French finally decided it was safe to advance across the open fields in front of them....
As the Germans engage in fisticuffs with a little tank.
I let the British "recycle" two of the knocked-out Matilda's (I had always intended to do this, but I was expecting it to be the Vickers light tanks that got knocked out!)
French infantry and armour moving forwards.
The excessively aggressive 6 Schützen Regt were also towing their AT guns FORWARDS towards the British left flank!
The 88mm Flak guns appeared in front of the advancing French when the next event card was turned over. However, they were in a precarious position immediately, as the French were almost on top of them before they had a chance to deploy! Fortunately, there was a ridge line concealing them from the French guns!
In another bit of good fortune, the Germans now got two or three initiatives in a row and were able to get the 88's deployed.
And the next event card saw the arrival of the German panzer support - PzKfw II and III - just in the nick of time!
Somua tanks, supported by infantry, advance over the ridge
SdKfz 251's of 3 SS Div Totenkopf, plus PzKfw 38t and PzKfw IV D's arrive just behind the 88's.
Two of the three Somua's were soon burning wrecks, but the French infantry assaulted one of the 88 guns and drove off the gunners, putting their weapon out of action.
The French had an event card around here, with off board artillery - unfortunately for them, it proved as ineffectual as the British!
Back with 6 Schützen Regt, the AT guns had taken out another Vickers light tank.
The second to last event card allowed the Germans two Stuka attacks by Sturzkampfgeschwader 2. By mutual agreement of the German players, the Luftwaffe were directed to attack the two Matilda tanks. (If you are wondering, the Stuka markings are for the Condor Legion, as the aircraft is part of Ricks SCW collection!)
And then, there were none!
Getting towards the end of the game, I think I missed taking photos for a couple of turns. You can see here that the third Somua has been knocked out, but the German tanks did not have it all their own way either. One PzKfw IVwas destroyed in an infantry assault by the British, who then managed to exit the table on the German side. What you can also see is the final special event card in operation, a second airstrike by the Luftwaffe. This was aimed at the two towed British AT guns in the centre of the picture.
And once again, a perfect strike from Sturzkampfgeschwader 2 - both tows and one of the two guns were destroyed!
There were only three cards left in the activation pack, and they were all German, so we called the game at this point. The Allies came close to their victory conditions of exiting troops off the German table edge, but we agreed one solitary infantry unit did not a breakthrough make, and the Germans were declared the winners.
I think everyone enjoyed the game but as the scenario designer, I made a few mistakes, the main one being I set up the event cards to more or less recreate what happened historically, in the right order, but that meant that three of the German players, Paul, Mark and Nick, had nothing to do for the first hour or two - which wasn't ideal. If I did this scenario again, I would probably make the initial German infantry column larger and give all the German players one unit and one gun to control initially, then when the reinforcements start arriving, players could drop out of that role and take command of one of the arriving forces. Apart from that, I was happy with the way things went, and getting a historical result when you are recreating a real action is always a good thing in my book, as long as the game isn't "set up" to come out in a certain way, which this one wasn't - it's not my fault Julian rolled crap dice in the first couple of turns when he could have almost wiped out the lorried infantry if he had got a few hits on them, nor that the British and French artillery hit nothing, even when they were adding 3 to the dice roll!


