A very brief overview of the battle, courtesy of the American Battlefields Trust:
On the sultry afternoon of June 17, 1775, Gage and his commanders ordered British regulars and grenadiers to be transported across Boston Harbor and disembarked in lower Charlestown. Howe led King George’s troops in the assault, but the situation had changed since the officer advocated his plan. The American left was not open and flanking column of eleven companies of light infantry were stopped cold as the made their way along the narrow beach. A second attempt was made to dislodge the fence defenders in concert with a frontal assault on the main redoubt atop the hill. This attack, too, failed. A third attack against the American fortifications atop Breed’s Hill finally carried the day for the British. Once again marching head on into musket fire, British tenacity and a lack of ammunition on American side finally carried the day for Gage and Howe. Henry Clinton declared it was “A dear bought victory; another such would have ruined us.” British losses amounted to roughly one-third of the men engaged. Within weeks Washington arrived to assume command of his army and undertake siege operations. For now, Patriot forces held the advantage in New England.
My game tonight was part two of the battle, the first attempted assault on the defensive positions on Breeds Hill. In my first game, I managed to get a historic result, with the column of light infantry companies being driven back by Starks men behind the stone wall/rail fence at the beach. How will the British fare in part two - read on to find out!
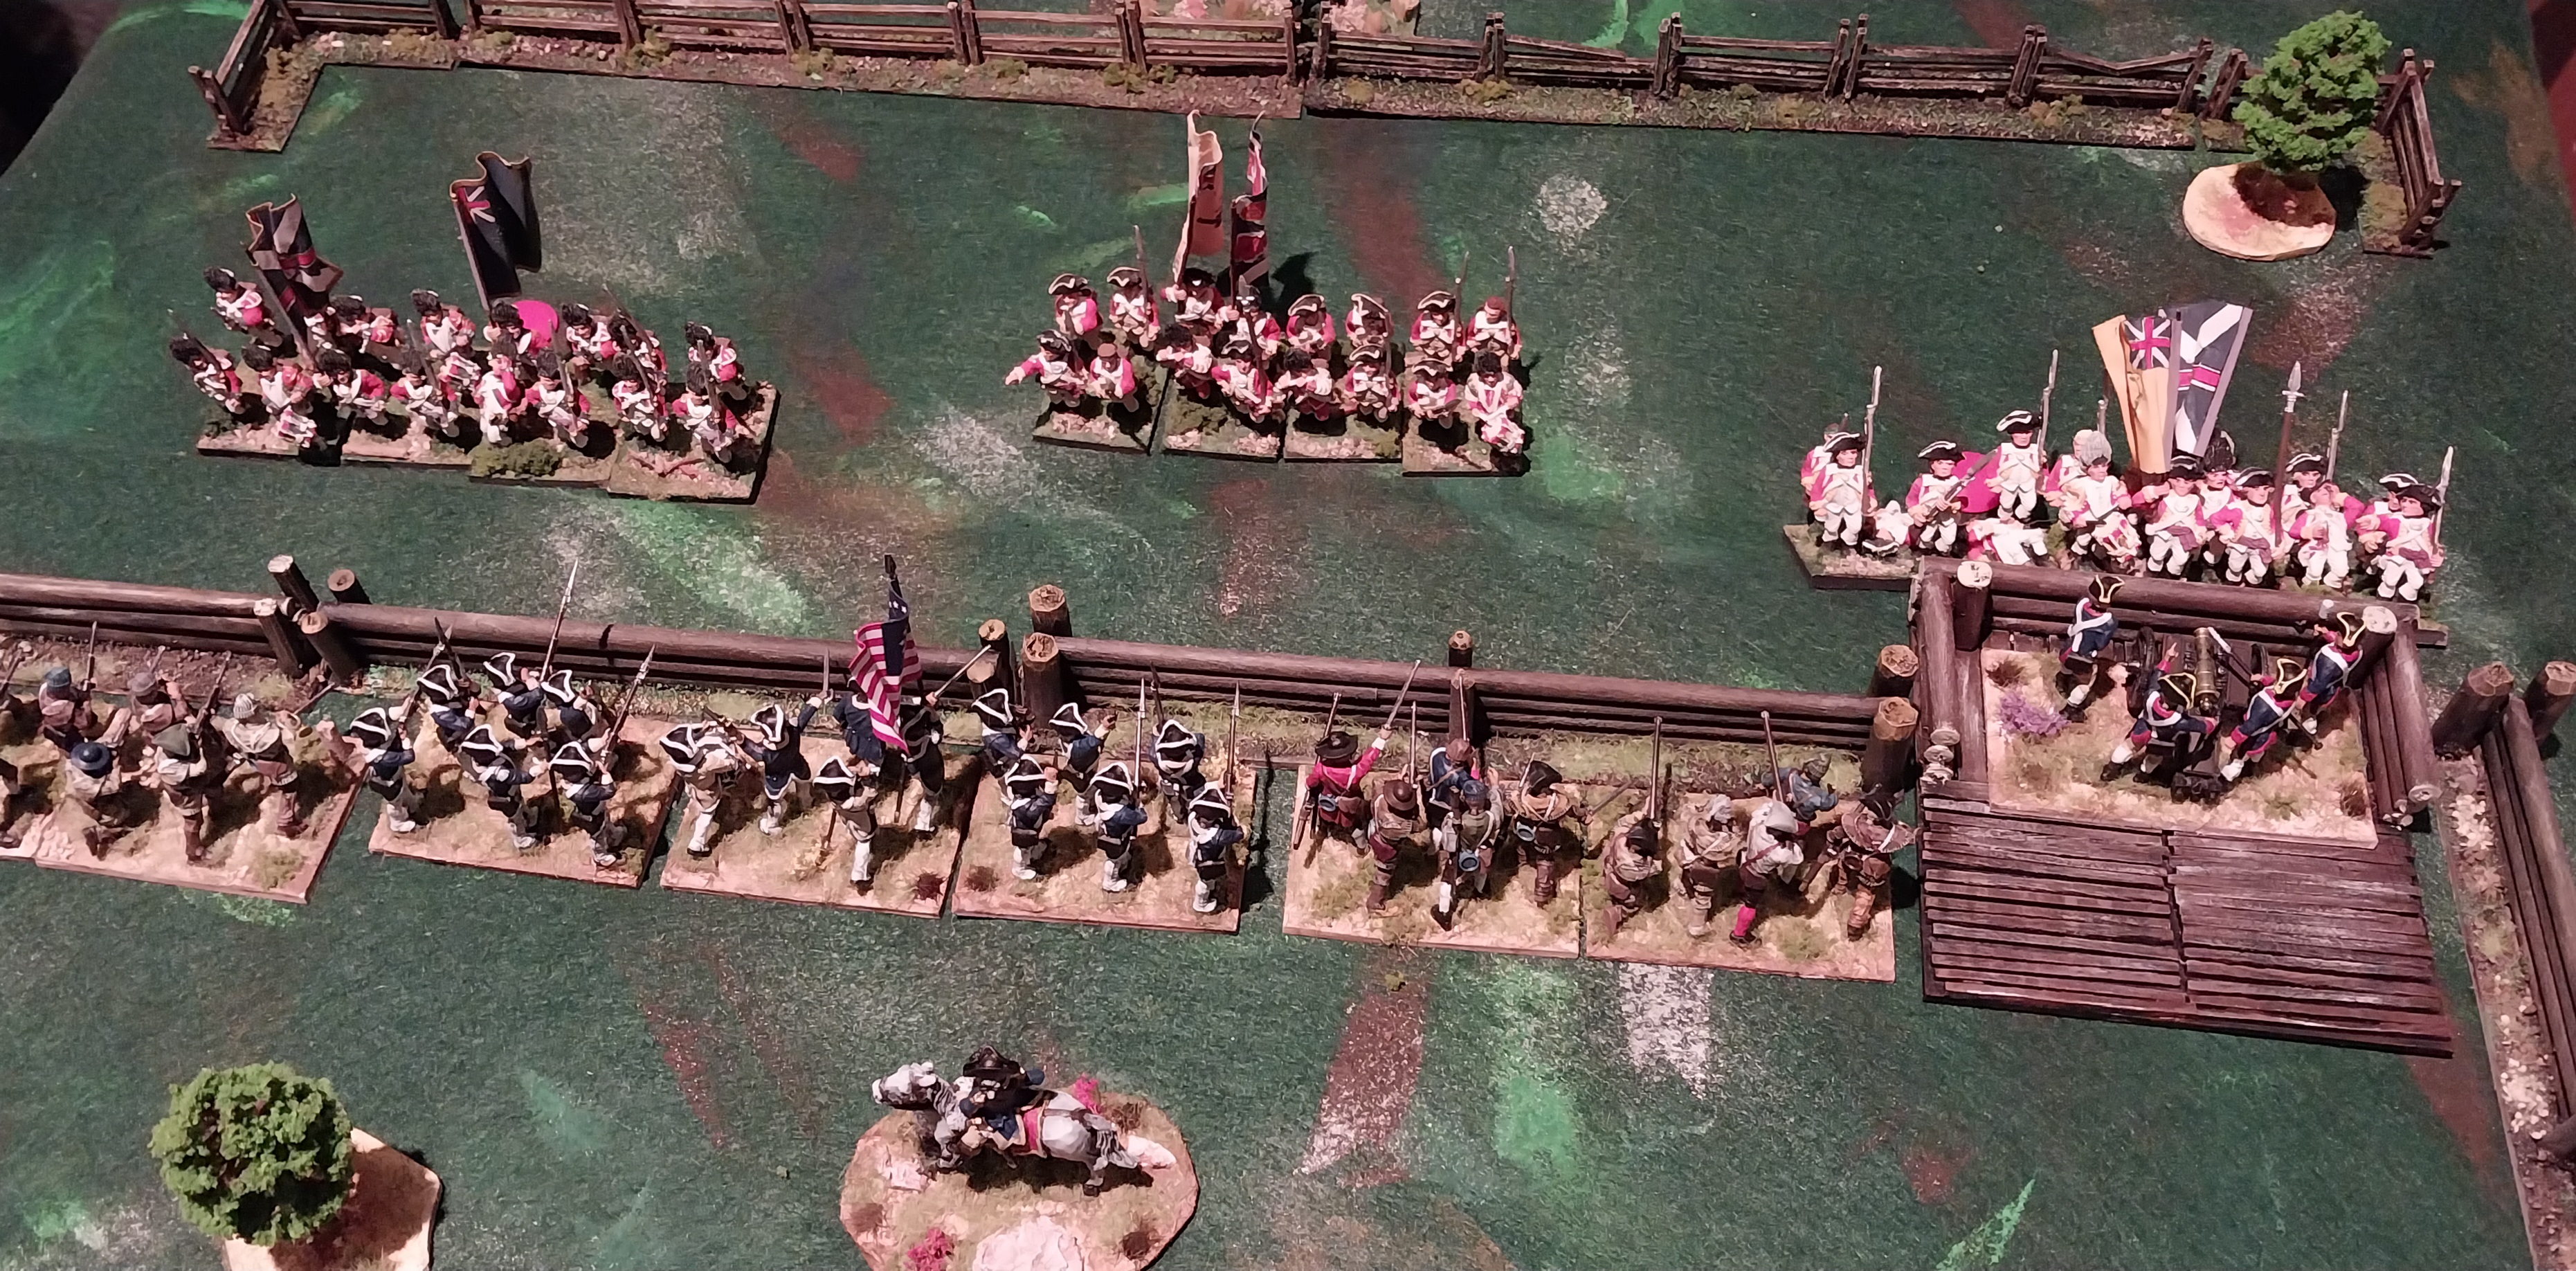
The battlefield from the British starting point (above) and from the American vantage point below
A view from the top!
The Brits - 21st Regiment of Foot (Royal North British Fusiliers) deputizing for the converged grenadier battalion
The 3rd Regiment of Foot or "Buffs" representing the 38th Foot
26th Regiment of Foot filling in for the 43rd.
Once again, I used our home brew AS9 rules, a deck of 22 standard playing cards to decide activation, 12 red for the Brits and 10 black for the Americans. The Brits automatically had the very first and last cards, and I shuffled the other 20 - a run of three red or black would automatically lead to the other side getting the next turn. A basic score of 9 to hit (with a few modifiers) and any unit reaching 4 hits was forced to retire immediately and continue doing so until they could rally off one hit marker. Movement is 2 x D6, minimum of 4cm, artillery fires 36 cm and small arms 18cm. I gave the American riflemen a +1 on firing but -1 for melee, as they generally had no bayonets. The grenadiers got +1 for quality.
Turn 1 British - they simply advanced - the centre unit was a bit lacking in aggression - a situation that would continue!
Move 2 was again the British, they simply advanced once more - the Americans were still out of range and holding their fire at this stage.
The grenadiers reach the second rail fence.
Brigadier General Pigot attempts to encourage the centre battalion to hurry up a bit!
Turn 3 was the first American initiative - the small American battery was now in range and opened fire - but to no effect!
One Turn 4, the British advanced yet again
Turn 5, another British initiative. Despite orders to the contrary, just like the real thing, the grenadiers opened fire on the militia behind their stout defensive palisade - no hits were scored but in the return fire, the grenadiers took a hit from the American riflemen!
Turn 6 was simply an attempt to rally the grenadiers ie remove the hit, which failed, then a steady plod forwards. In turn 7, the Americans had the initiative and fired with some effect, the artillery getting a hit with grape shot and the militia on the other flank putting a second hit on the grenadiers - inaccurate return fire from the crown forces caused no damage to the rebels/patriots.
In turn 8, initiative returned to the British. They managed to rally one hit of the grenadiers then made a general advance, with the left flank battalion being in range to put in an assault on the gun battery. The Brits were fighting at -1 because the gun was behind cover, the Americans with +1 because they had infantry in support. The Brits rolled 11 - 1 = 10 the Americans rolled 9 +1 = 10 - a draw!
Turn 9 was an American initiative, they fired and put another hit on the grenadiers; once again, British return fire was ineffectual, and the melee against the gun position carried on into a third round
Turn 10 went again to the Americans, but they were unable to capitalise; indeed, on this occasion the British grenadiers managed to put a hit on the riflemen opposite them. The melee was once again inconclusive.
This looks like a win for the Brits but as they were minus one and the Americans were +1, it was actually a draw, with both sides taking a hit!
On turn 11, the British rallied another hit off the grenadiers, then made a general assault on the American position
Despite being at a disadvantage, the previously dilatory centre unit, cheered on by General Pigot, won the fight
Then, the grenadiers made it 2/3 for the redcoats.
The centre of the American position was driven back by the ferocity of the British bayonet work.
But in the next round of combat, the British left flank battalion was driven back from the gun position.
In the next American turn, the gun puts a round of grape shot into the Brits, taking them to a total of 4 hits and forcing an immediate retiral of 2 D6 cm.
Meanwhile, on the British right flank, the grenadiers are forcing the last American infantry unit back from the palisade, a double six causes 2 hits rather than 1.
As the British left flank battalion fails to rally and continues its flight down Breeds Hill, the other two units exchange fire with the Patriot forces.
The Americans had a couple of initiatives in a row and fired with no effect before closing in to melee range again. The grenadiers immediately sent the militia reeling back once more, however.
In the centre, though, the combined militia and regular infantry overcame the British, who fell back.
By turn 16, the American line looked as though it had stabilized again.
But the grenadiers were still winning their fight on the right flank
Whilst the left flank battalion continued to fail to rally and were almost back at their starting point!
Encouraged by General Pigot (they rallied off a hit point) the British centre advanced once more, and soon, the Americans were on the back foot again.
In an exchange of fire between the American regulars and the grenadiers, the British put a double hit on the enemy, taking the unit to a total of 4, forcing a 2D6 cm retirement, which took the American unit off the table and out of the fight!
The Americans were not done yet, however, and they had a run of initiatives that allowed them to fire and prevented the British from attempting any rallies.
The grenadiers, however, forced the opposing militia unit up to 4 hits and they too rolled high and left the table permanently
But the British were only slightly better off than their opponents, with now both the line battalions sitting on 4 hits and being forced to fall back down Breeds Hill.
The last two initiatives fell to the British, and their officers finally managed to get the left flank unit back under control (the unit rallied off one hit marker so ceased the automatic withdrawal each turn)
The grenadier battalion, at full strength and full of vim and vigour (ie having rallied off any hit markers) faced off against a single weakened militia unit, whilst the American artillerymen kept a wary eye on the two British line battalions they had helped drive off.
The final situation as the last of the 22 cards was turned.
I decided NOT to add a few more turns to see what happened, I was happy with the game and the result I reached and if I am just going to add extra turns in, there is no point in having a limited number of activation cards in the first place!
Once again, the easy and fast play rules Andrew has created gave me an enjoyable game. 22 turns in 90 minutes and a semi historical outcome - 2 out of 3 units driven back to their starting line was a fairly satisfying result for me. Now, I will have to read up on Major Pitcairn and his marines and how the British third attack finally succeeded - if you believe the Americans, they only did so because they (the Americans) ran out of ammunition!
Thanks for stopping by and double thanks to those of you kind enough to leave a comment!


Good stuff, Keith! This is a battle I have fought many times with victories seen from both armies. In the last go, my colonials saw the British off in a Rebels and Patriots game with Matt.
ReplyDeleteThanks Jon, I would quite like to get some larger AWI battles in again with our "Sunday group" - we did Bunker Hill, Guildford Courthouse and Brandywine 20+ years ago - possibly a couple of others too, I certainly have the scenario plans I did back then - Eutaw Springs and Kings Mountain, too!
DeleteThat was a right royal romp!
ReplyDeleteCheers Ray!
DeleteFantastic looking battle sir!
ReplyDeleteThanks Michal, glad you liked it!
DeleteTight game, overall in line with history , happy to see your rules work
ReplyDeleteThanks Joe, I am already thinking about the tweaks I will need to do in game three 🤔
DeleteJust a quick note, 22 turns in a game, much less in 90 minutes is considerable. Tweaking you say is up next?
DeleteTough going for the British, but they were hanging in there. The rules seem to give a quick and fun game.
ReplyDeleteThanks Lawrence...tough for the British, but even tougher for the Americans, in comparison to what actually occurred on the day. I think these rules are particularly good for solo gaming, and as there are only about three things to remember, once you have played a couple of times, things move along at a good clip!
DeleteGreat looking game Keith. The revolution is safe for now.
ReplyDeleteThanks Ben, safe, but only just! The British grenadiers did better than they were supposed to !!
DeleteInteresting approach Keith breaking the battle down into smaller sections. As many scenarios getting the balance right is hard, as Jon has mentioned above in our version the hill proved too much !
ReplyDeleteThanks Matt, it is invention of necessity, given I only have 3' x 3' to fit the games into!
DeleteI copied the idea from the Barry Hilton "4Play" range of scenarios for the GNW, and for certain battles, it is a very workable solution.
Did either you or Jon do a post on your Bunker Hill game....I followed your series of early AWI games but I don't recall that one....mind you, given the chronology of the battles, it should have been one of the first!
Ignore me Matt....I found your AAR...AND my own comments on it.....I blame all the drinking in my late teens and early twenties!
DeleteGlad you found it Keith 👍
DeleteSuperb game Keith, those Grenadiers were certainly handy with their bayonet work
ReplyDeleteCheers Scotty, yes, the grenadiers showed their mettle in this game, for sure!
DeleteAbsolutely brilliant, not a era I am overly familar with, but finding these post fascinating.
ReplyDeleteThank you Michael, I hope I carry on providing interesting insights into this period...it is one of my favorites, I think!
DeleteA fine game there Keith and good to see your new terrain items in action. I always think this is a tough ask for the British, as it should be, but like the idea of playing the whole battle to explore possible options for attack. Not always possible to do this of course some snapshot action is a good way to go:).
ReplyDeleteThank you Steve...when doing historical refights (a rarity in our group games) I like to try and stick to the tactics and maneuvers used by the actual commanders on the day, although hopefully not always exactly recreate what happened!
DeleteI guess most battles can be broken down into a series of smaller actions....I will have to put my thinking cap on and take a look at some other AWI classics....
A great looking game and an enjoyable read, I thought that the Rebels might just take the day but the Brits prevailed, a real hard fought win.
ReplyDeleteThanks Donnie, and yes, at turn 16 when all the Patriot units were back at the redoubts walls, and two of the British units were reeling back, I thought a historically accurate British defeat looked imminent....but the grenadiers had other ideas!
DeleteGreat game Keith and one that I have on my bucket list to do. I never thought of breaking it down like this. Great idea. Thanks for sharing. It always seems a tough ask for the Redcoats- go the Marines for the next round!!
ReplyDeleteThanks John, as mentioned above, not an original idea but one I am happy to adopt!
Deletei think I will give the Marines plus 4 on all die rolls - they are OBVIOUSLY better than grenadiers, right?!
A cracking knock about game Keith…
ReplyDeleteI liked the idea that the troops were just left with enough energy to stare each other out …. And not much else.
All the best. Aly
Cheers Aly, the end result seemed just about right to me, too.
DeleteAll the stuff you made came in handy real fast. must be a record for the time that terrain was made and then used in a game. the glue probably wasn't even all dry. 😁
ReplyDeleteNice redo of bunker hill. It's hard to advance into fire in many games.
Thanks Stew! Most of the terrain was specifically made so I had it for this game, so.....!
DeleteIn game three, the Brits have to do it all again....but the Americans will be running low on ammunition...